Local App Development
This guide covers how to start developing your headless WordPress app locally. In the previous Getting Started guide, you should have identified a repository for your app and deployed that app to our Headless Platform. This guide will build on those steps and help you create both JavaScript and WordPress development environments on your local machine.
Prerequisites
Section titled “Prerequisites”The following tools are required for local app development.
Git installed on your local machine
To make sure you have Git installed on your computer, open your command line application and run git --version. You should receive a response similar to git version <version-number> if it is installed.
If you don’t have Git installed, follow the instructions on GitHub’s website to install it: Install Git.
Node.js version 16 or higher on your local machine
Our Headless Platform supports Node.js-based applications. To see supported versions of Node.js and how to change the Node.js version you are using see Configuring Builds →
To make sure you have Node.js installed on your computer, run node --version on the command line. A version number such as v16.4.1 will be printed to the command line if it is installed.
You can install a supported version from the Node.js website. Alternatively, you can choose to use a tool like NVM if you need to be able to switch between several different version of Node on the same machine.
GitHub or Bitbucket SSH keys configured
Most of the examples in this guide assume that you will be using SSH to move code to and from your repository. If you’re unsure whether you have SSH keys set up already, you can follow these guides:
GitHub
- Checking for existing SSH keys
- Generating a new SSH key and adding it to the ssh-agent
- Adding a new SSH key to your GitHub account
Bitbucket
Frontend App Configuration
Section titled “Frontend App Configuration”Clone Repo
Section titled “Clone Repo”Depending on the source control repository hosting provider you’re using, follow the the Github instructions or Bitbucket instructions to clone your repository to your local machine:
Define Environment Variables
Section titled “Define Environment Variables”With your repository cloned and set to the current directory in your terminal, open the codebase in a code editor. When your app was deployed to our Headless Platform, an environment variable file was automatically provisioned. Most apps rely on environment variable files to store critical information your app will rely on, like the URLs of backend APIs, API keys, or other configuration details that should not get checked into source control.
In the following steps, you will recreate that file in your local project for development.
Create Environment Variables File
Section titled “Create Environment Variables File”Create a file in the root directory of the project where you can define environment variables. The name of this file varies depending on the JavaScript framework you’re using.
- Faust.js, Next.js and SvelteKit apps typically use
.env.local - Gatsby apps typically use
.env.development - Nuxt.js environment variables are typically defined inside of your
nuxt.config.jsfile, or in a.envfile if you’re using the@nuxtjs/dotenvmodule.
If you’re using another framework, please reference your framework’s documentation to learn how to define environment variables.
You can create the file for Faust.js starter projects via the command line using the following command:
touch .env.localAdd Variables to Environment Variables File
Section titled “Add Variables to Environment Variables File”With your environment variable file created, you can access your live app’s environment
- In a web browser, log into the WP Engine User Portal. Click
Headless Platformin the sidebar, look for the name of the app associated with this project, then click on it’s associated child environment.
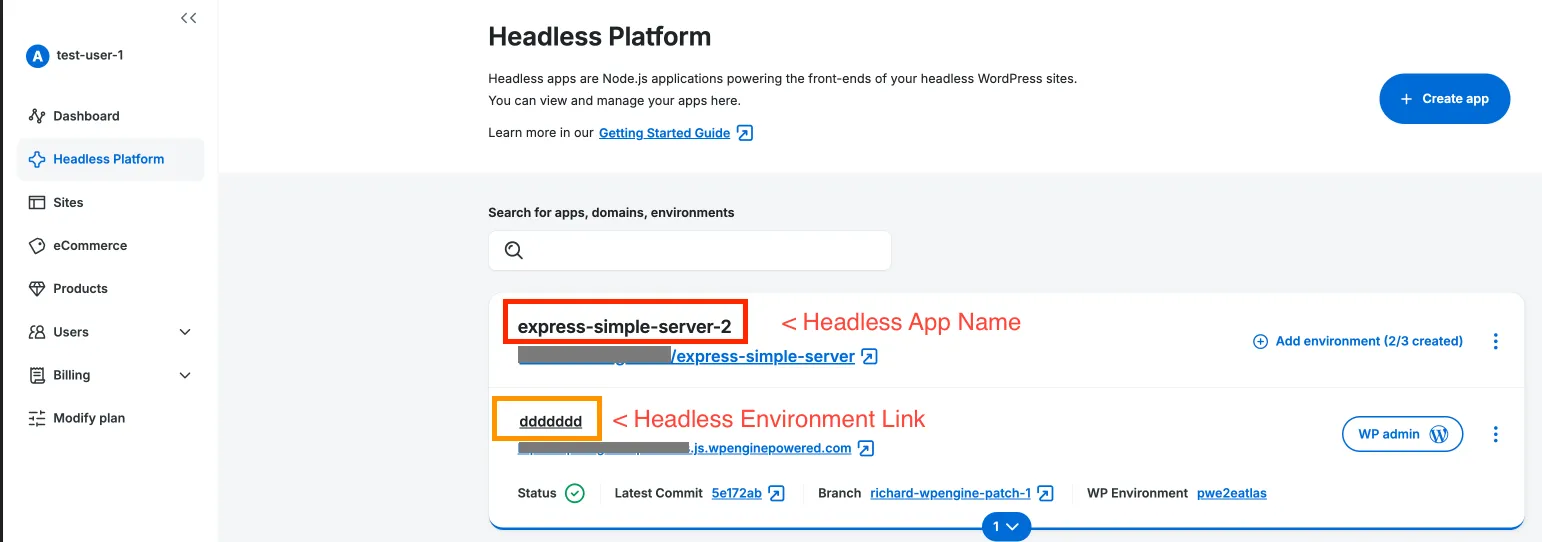
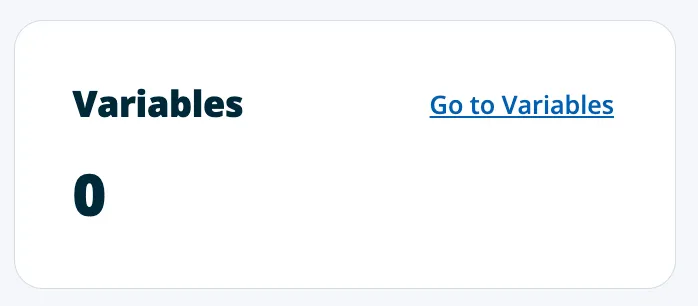
- Click
Go to Variableslink, beside theVariablescard heading, or selectVariablesfrom the Environment side menu.
- On the
Manage Variablespage that opens, toggle theHide all valuescontrol to theoffposition.
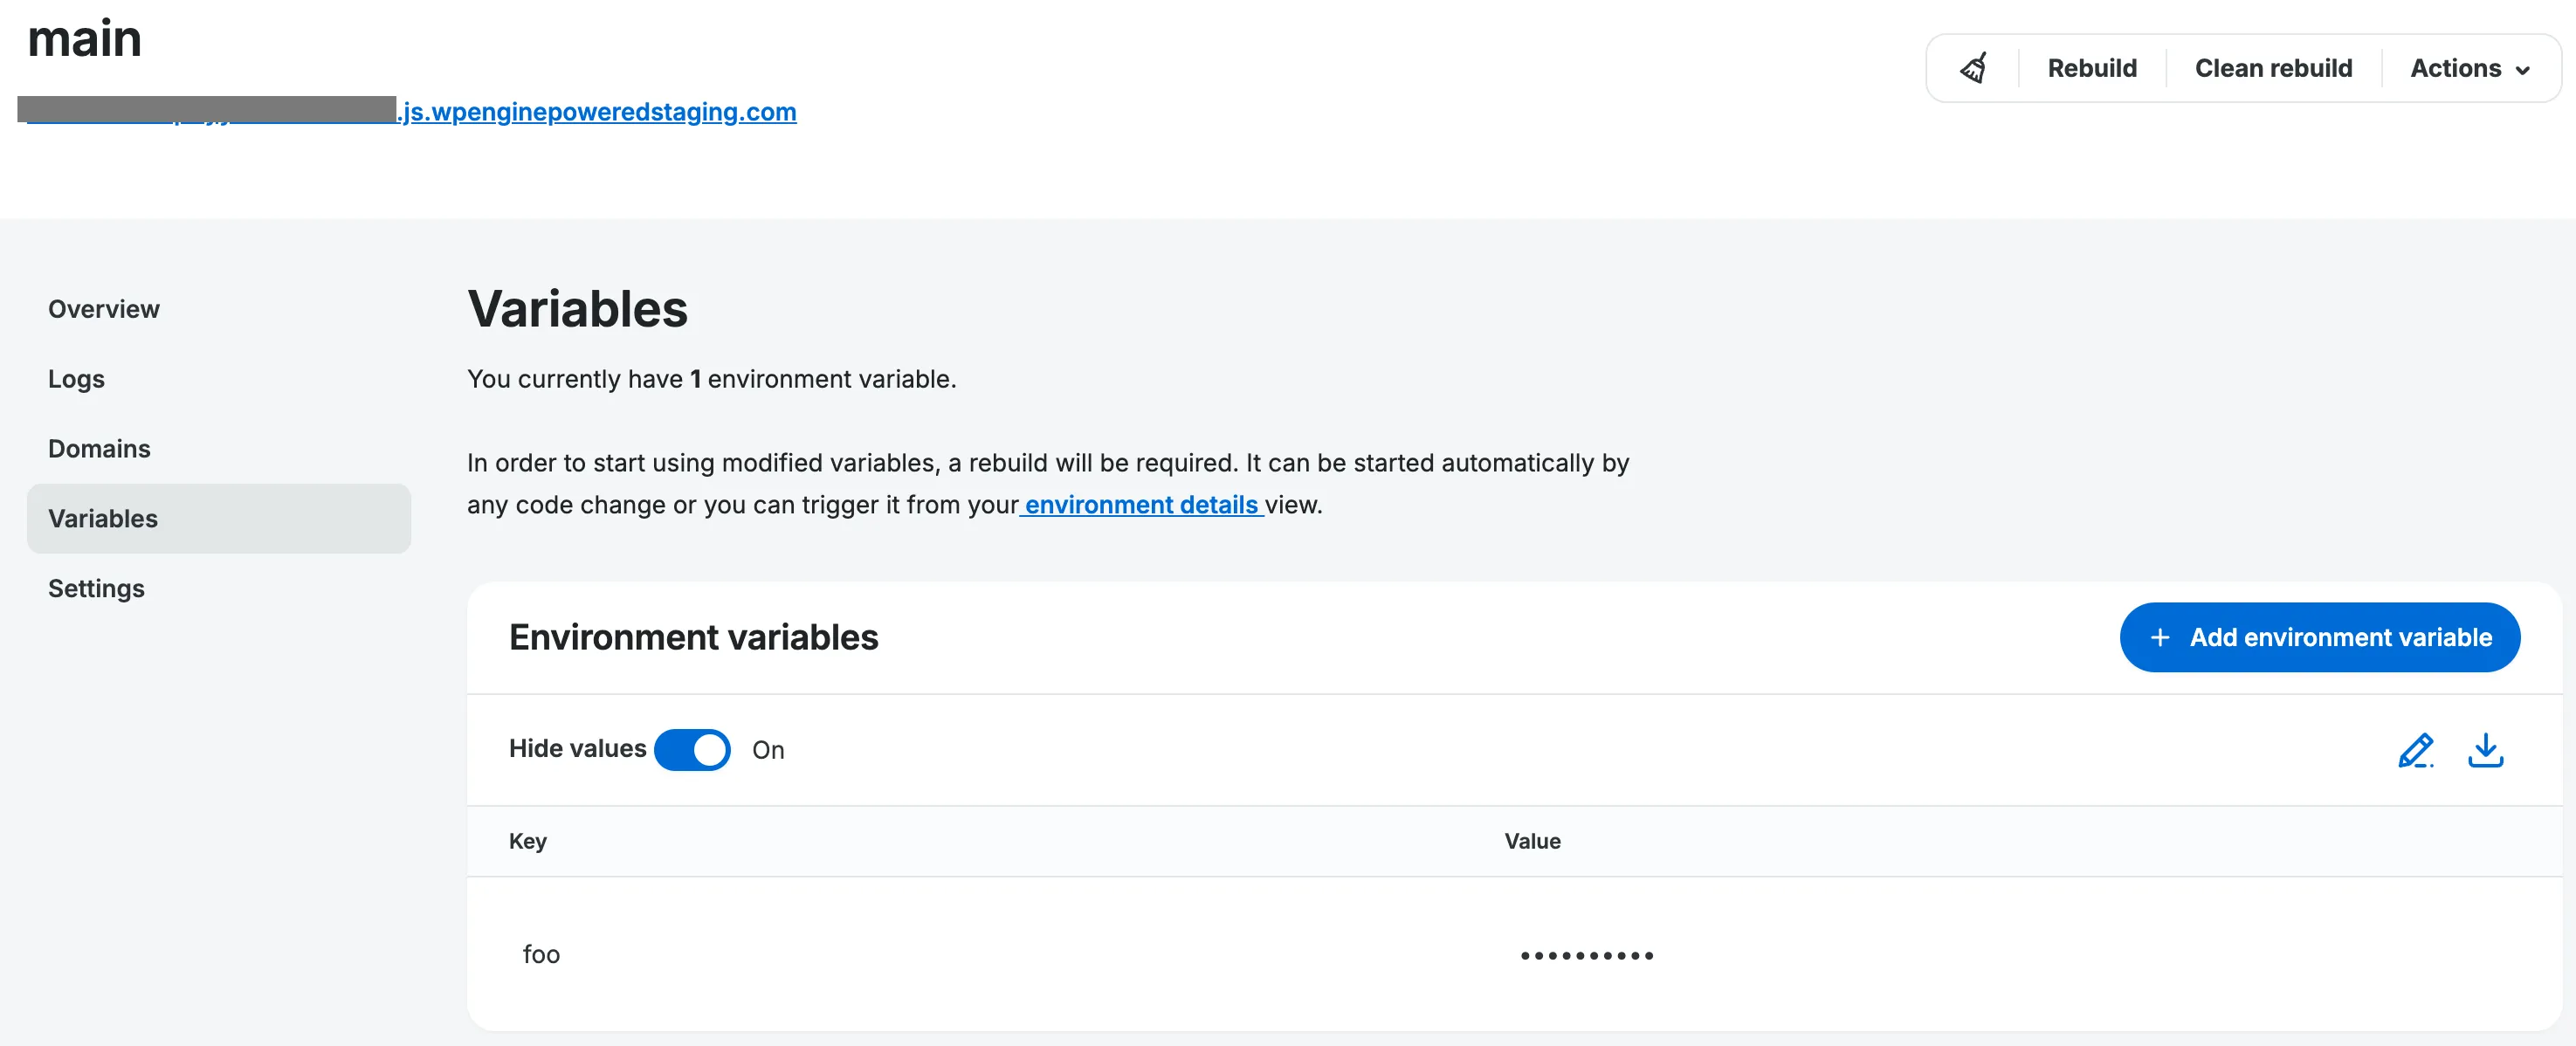
- Copy and paste the
KeyandValuepairs for each environment variable into your local environment variables file.
As an example, if your app has these two environment variables listed in the User Portal:
| Key | Value || ------------------------- | ---------------------------- || NEXT_PUBLIC_WORDPRESS_URL | https://my-site.wpengine.com || FAUSTWP_SECRET_KEY | ABC123 |You would need to add them to your environment variables file (.env.local/.env.development/other) in this format:
NEXT_PUBLIC_WORDPRESS_URL=https://my-site.wpengine.comFAUSTWP_SECRET_KEY=ABC123Install Dependencies and Start App
Section titled “Install Dependencies and Start App”To install your frontend app’s npm dependencies, run the npm install command in the terminal.
Once your dependencies have finished installing, you can run the command to start your JavaScript app in development mode. If your site was created with the Faust.js starter, the command npm run dev will start your app in development mode and make it available at localhost:3000 in a web browser.
If you are using another framework, you will need to reference that framework’s docs or package.json file.
Push Changes to the Headless Platform
Section titled “Push Changes to the Headless Platform”With your site running in development mode, the app running in the browser is sourcing your local JavaScript files for the frontend, but still pulling data from your remote WordPress install on WP Engine’s servers. In the next step of this guide, you will learn how to create a separate WordPress environment locally to isolate your development work, but now is a great time to test your connection to your repository and the Headless Platform.
Make some basic changes to your site locally: add a component, change the way posts or pages are displayed or update the site styles with your own CSS.
Once you are ready to push your changes, you can trigger a rebuild of your site by pushing to your repository. A basic workflow assuming SSH configuration would look like this:
git add .# This command adds all of the changed files to Git for staginggit commit -m "A description of my changes"# This command commits my changes with a helpful but succinct messagegit push -v# This command will push your changes from your local machine to your repositoryUsing the -v or verbose flag should give you feedback in the terminal window after you run the command.
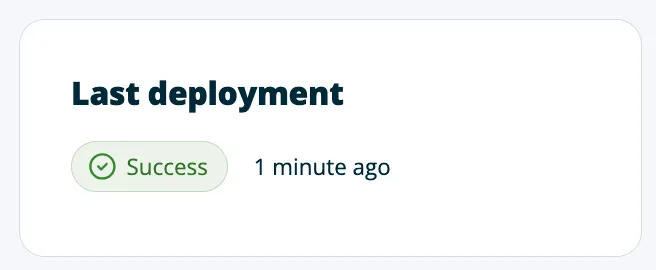
Once your changes are processed by your repository, our Headless Platform will automatically begin rebuilding your application based on your latest commit. If you open the User Portal in the browser, and navigate to the associated environment, you can get feedback regarding the build/ deployment state of your app.
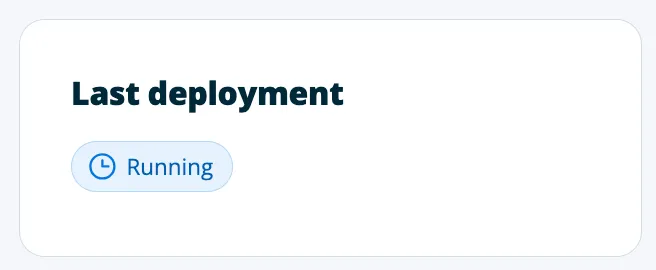
Once the app has successfully finished building and deploying, you will see a success message that looks like this:
If your build is not successful, you can reference our guide on troubleshooting builds for suggestions on how to work through a failing build.
WordPress Site Configuration
Section titled “WordPress Site Configuration”Depending on your existing development tools and needs, there are multiple ways to source data as you develop your site locally. WP Engine’s Local WordPress development environment offers existing WP Engine customers the most robust feature set, but we understand that users may have different tooling or wish to develop directly against their production WordPress environment. Below you can find a short summary of the various approaches to working with a local headless WordPress site:
- Connect Directly to the Remote WordPress Site
- Non-Local WordPress Development Environments
- WP Engine’s Local Development Environment
After you’ve decided on the method you will use to connect your local JavaScript app to a WordPress environment, you may need to replace the WordPress URL in your environment variables file to finish the connection.
Connect Directly to Remote WordPress Site
Section titled “Connect Directly to Remote WordPress Site”Technically speaking, you could run your frontend JavaScript application locally and connect it directly to a remote WordPress site hosted online rather than a local WordPress site. While this seems like the simplest approach, it is generally discouraged if your app will make changes to data or if other people will continue updating posts, pages, menus or other settings during development. Some developers may choose to pursue this option early in the development process, but they should be aware of possible side effects.
If you choose this method, no local WordPress site setup is required.
Using Local
Section titled “Using Local”Local is a free app for local WordPress site development, and its Local Connect feature allows you to easily pull down a WP Engine-hosted WordPress site to your local machine.
Here are the steps to follow:
- Install Local if you don’t already have it on your computer.
- Follow the Local Connect documentation. Select WP Engine as the hosting provider you’d like to connect to and pull down the WordPress site associated with your app.
When finished, you should have a local version of the WordPress site set up.
See the Local Help Docs for further documentation on working with Local.
Password Reset
Section titled “Password Reset”If you created your WordPress site from the WP Engine User Portal, you may not know the password for your WordPress user account. You’ll need that in order to log into the WordPress admin on your local machine. Here’s how you can reset your password:
-
Make sure your site is up and running in Local.
-
Right-click on your site’s name in the sidebar and click
Open site shell.
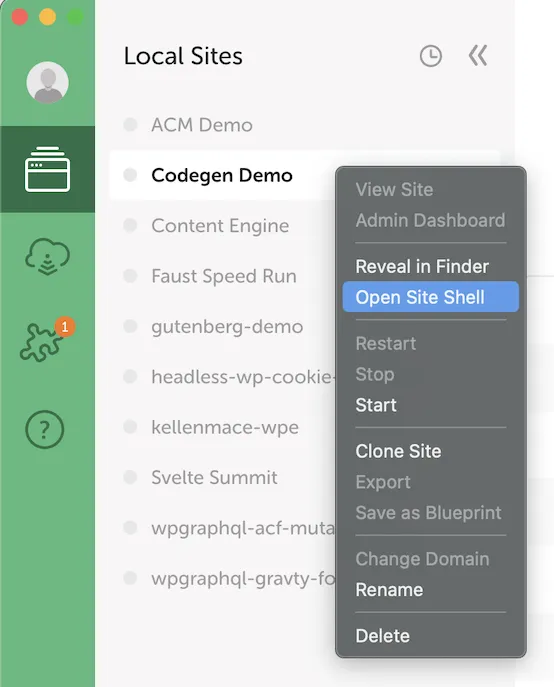
Your command line app will open and a command will be executed to open an SSH connection to the local WordPress site. You should see output similar to this:
$ /Users/john.smith/Library/Application\ Support/Local/ssh-entry/WLLn7jJ4a.sh; exit-n -eSetting Local environment variables...----WP-CLI: WP-CLI 2.5.0Composer: 2.1.5 2021-07-23PHP: 7.4.1MySQL: mysql Ver 8.0.16 for macos10.14 on x86_64 (MySQL Community Server - GPL)----Launching shell: /bin/zsh ...- Run
wp user update john.smith@example.com --user_pass=passwordon the command line, wherejohn.smith@example.comis the email address for your WP Engine account andpasswordis the new password you’d like to use to log into your local WordPress site.
If your password was updated successfully, you will see output similar to this on the command line:
Success: Updated user 1.You should now be able to click the Admin button in Local and log into the WordPress admin using the email address for your WP Engine account and the new password you set.
Local Alternatives
Section titled “Local Alternatives”If you are already using an alternative to Local, such as MAMP, XAMPP or DesktopServer, you can connect your decoupled frontend directly to a site served by one of those tools.
You will need to follow the documentation those products provide for creating a local WordPress site and migrating a copy of your WordPress site to your local machine. Once you have made the site available via one of these tools, you will need to replace the WordPress URL in your environment variables file to finish the connection.
Replace WordPress Site URL
Section titled “Replace WordPress Site URL”In many app configurations, including the Faust.js starter, you will store the URL of the WordPress site where the app sources its data in the environments variable file: .env.local. If you want the app to source its data from your local WordPress site instead, replace this value with the URL of your local WordPress site.
As an example, if your project has a NEXT_PUBLIC_WORDPRESS_URL environment variable and your local WordPress site URL is http://my-site.local, then that environment variable should be updated to NEXT_PUBLIC_WORDPRESS_URL=http://my-site.local.
When finished, save the environment variables file. This will result in you having separate environment variables for your local and production environments. If need more guidance on creating environment variable files or setting variable values, you can reference the define environment variables section of the previous guide.