RAG chatbot example
Introduction
Section titled “Introduction”In this step-by-step guide, we will build a full-stack application that uses WP Engine’s AI Toolkit, Retrieval Augmented Generation (RAG), and Google Gemini to deliver accurate and contextually relevant responses in a chatbot within a Next.js framework, hosted on WP Engine’s Headless Platform.
Before we discuss the technical steps, let’s review the tools and techniques we will use.
Retrieval-augmented generation (RAG) is a technique that enables AI models to retrieve and incorporate new information.
It modifies interactions with a large language model (LLM) so that the model responds to user queries with reference to a specified set of documents, using this information to supplement information from its pre-existing training data. This allows LLMs to use domain-specific and/or updated information.
Our use case in this article will include providing chatbot access to our data from Smart Search.
WP Engine’s AI Toolkit
Section titled “WP Engine’s AI Toolkit”Here’s an overview of WP Engine’s AI Toolkit and the core capabilities it brings to both traditional and headless WordPress sites:
- Smart Search & AI-Powered Hybrid Search At its heart, the AI Toolkit includes WP Engine Smart Search—a drop-in replacement for WordPress’s native search that’s typo-tolerant, weight-aware, and ultra-fast. Out of the box, you get three modes: Full-Text (stemming and fuzzy matching), Semantic (NLP-driven meaning over mere keywords), and Hybrid (a tunable blend of both). Behind the scenes, Smart Search automatically indexes your Posts, Pages, Custom Post Types, ACF fields, WooCommerce products, and more—so you can serve richer, more relevant results without writing a line of search logic yourself.
- Vector Database, Fully Managed You don’t need to stand up or scale your own vector store—WP Engine’s AI Toolkit manages that for you. As new content is published or edited, the plugin streams updates in real time to its vector database. Queries are encoded into embeddings, nearest-neighbor lookups happen in milliseconds, and the freshest site content is always just a search away. This under-the-hood Vector DB also powers the AI aspects of Hybrid Search, ensuring that semantic similarity and context ranking work against live data.
- Headless Integration For sites using WP Engine’s Headless Platform, all of these features—Smart Search querying, vector indexing, AI-powered hybrid ranking, and recommendations—are exposed through GraphQL. The AI Toolkit installs and configures both WPGraphQL and Smart Search automatically, so your front-end app can orchestrate retrieval and generation without extra middleware.
- Recommendations An AI-driven content discovery feature that helps you surface “Related” or “Trending” posts (or custom post types) anywhere on your site—whether you’re using the Gutenberg editor or building a headless front end via WPGraphQL.
Google Gemini API (AI API’s)
Section titled “Google Gemini API (AI API’s)”The Google Gemini API offers developers a powerful and versatile interface to access Google’s state-of-the-art Gemini AI models. These multimodal models are designed to seamlessly understand and generate content across various data types, including text, code, images, audio, and video.
For our chatbot integration, the Gemini API provides advanced natural language understanding, allowing it to interpret user queries and generate human-like responses. It supports multi-turn conversations, maintaining context over extended interactions, which is crucial for building engaging and intelligent conversational experiences. We will leverage the API’s flexibility to customize chatbot behavior, tone, and style, enabling a wide range of use cases from customer service to creative content generation.
Prerequisites
Section titled “Prerequisites”To benefit from this article, you should be familiar with the basics of working with the command line, headless WordPress, Next.js, and the WP Engine User Portal.
Steps for setting up:
Section titled “Steps for setting up:”-
Set up an account on WP Engine and get a WordPress install running.
-
Add a Smart Search license. Refer to the docs here for adding a license.
-
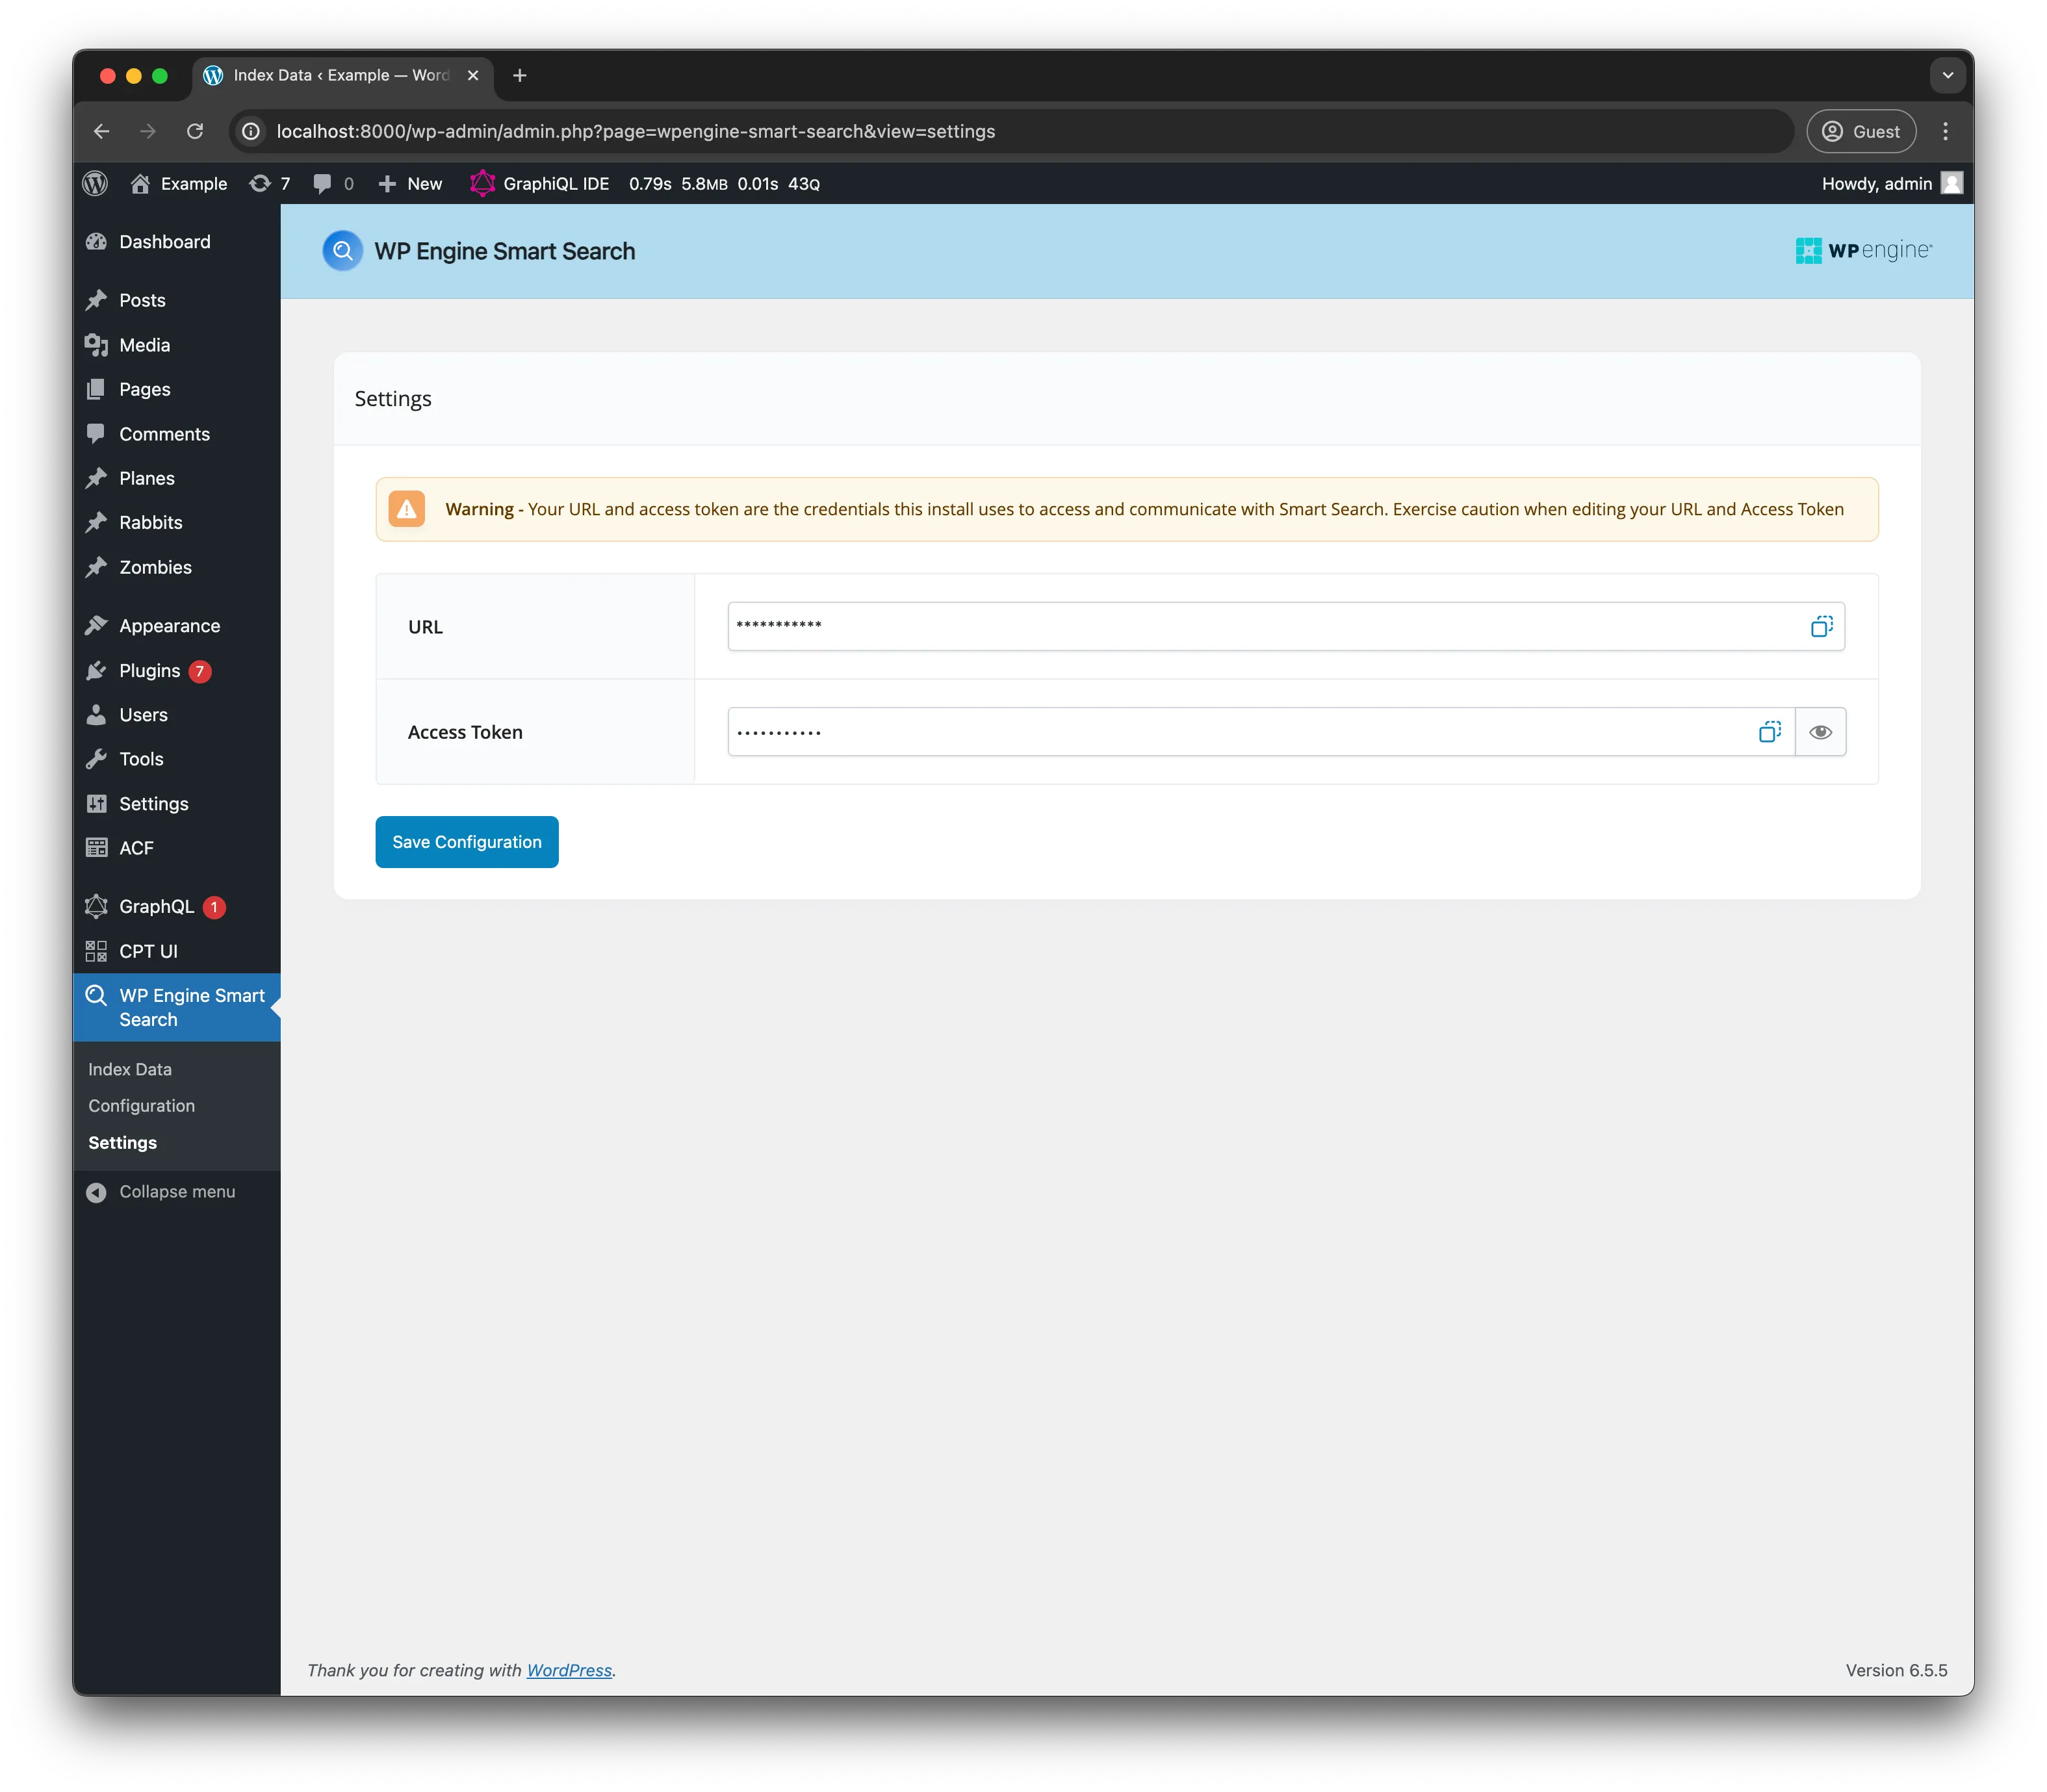
Navigate to the WP Admin of your install. Inside your WP Admin, go to
WP Engine Smart Search > Settings. You will find your Smart Search URL and access token here. Copy and save it. We will need it later. You should see this page:
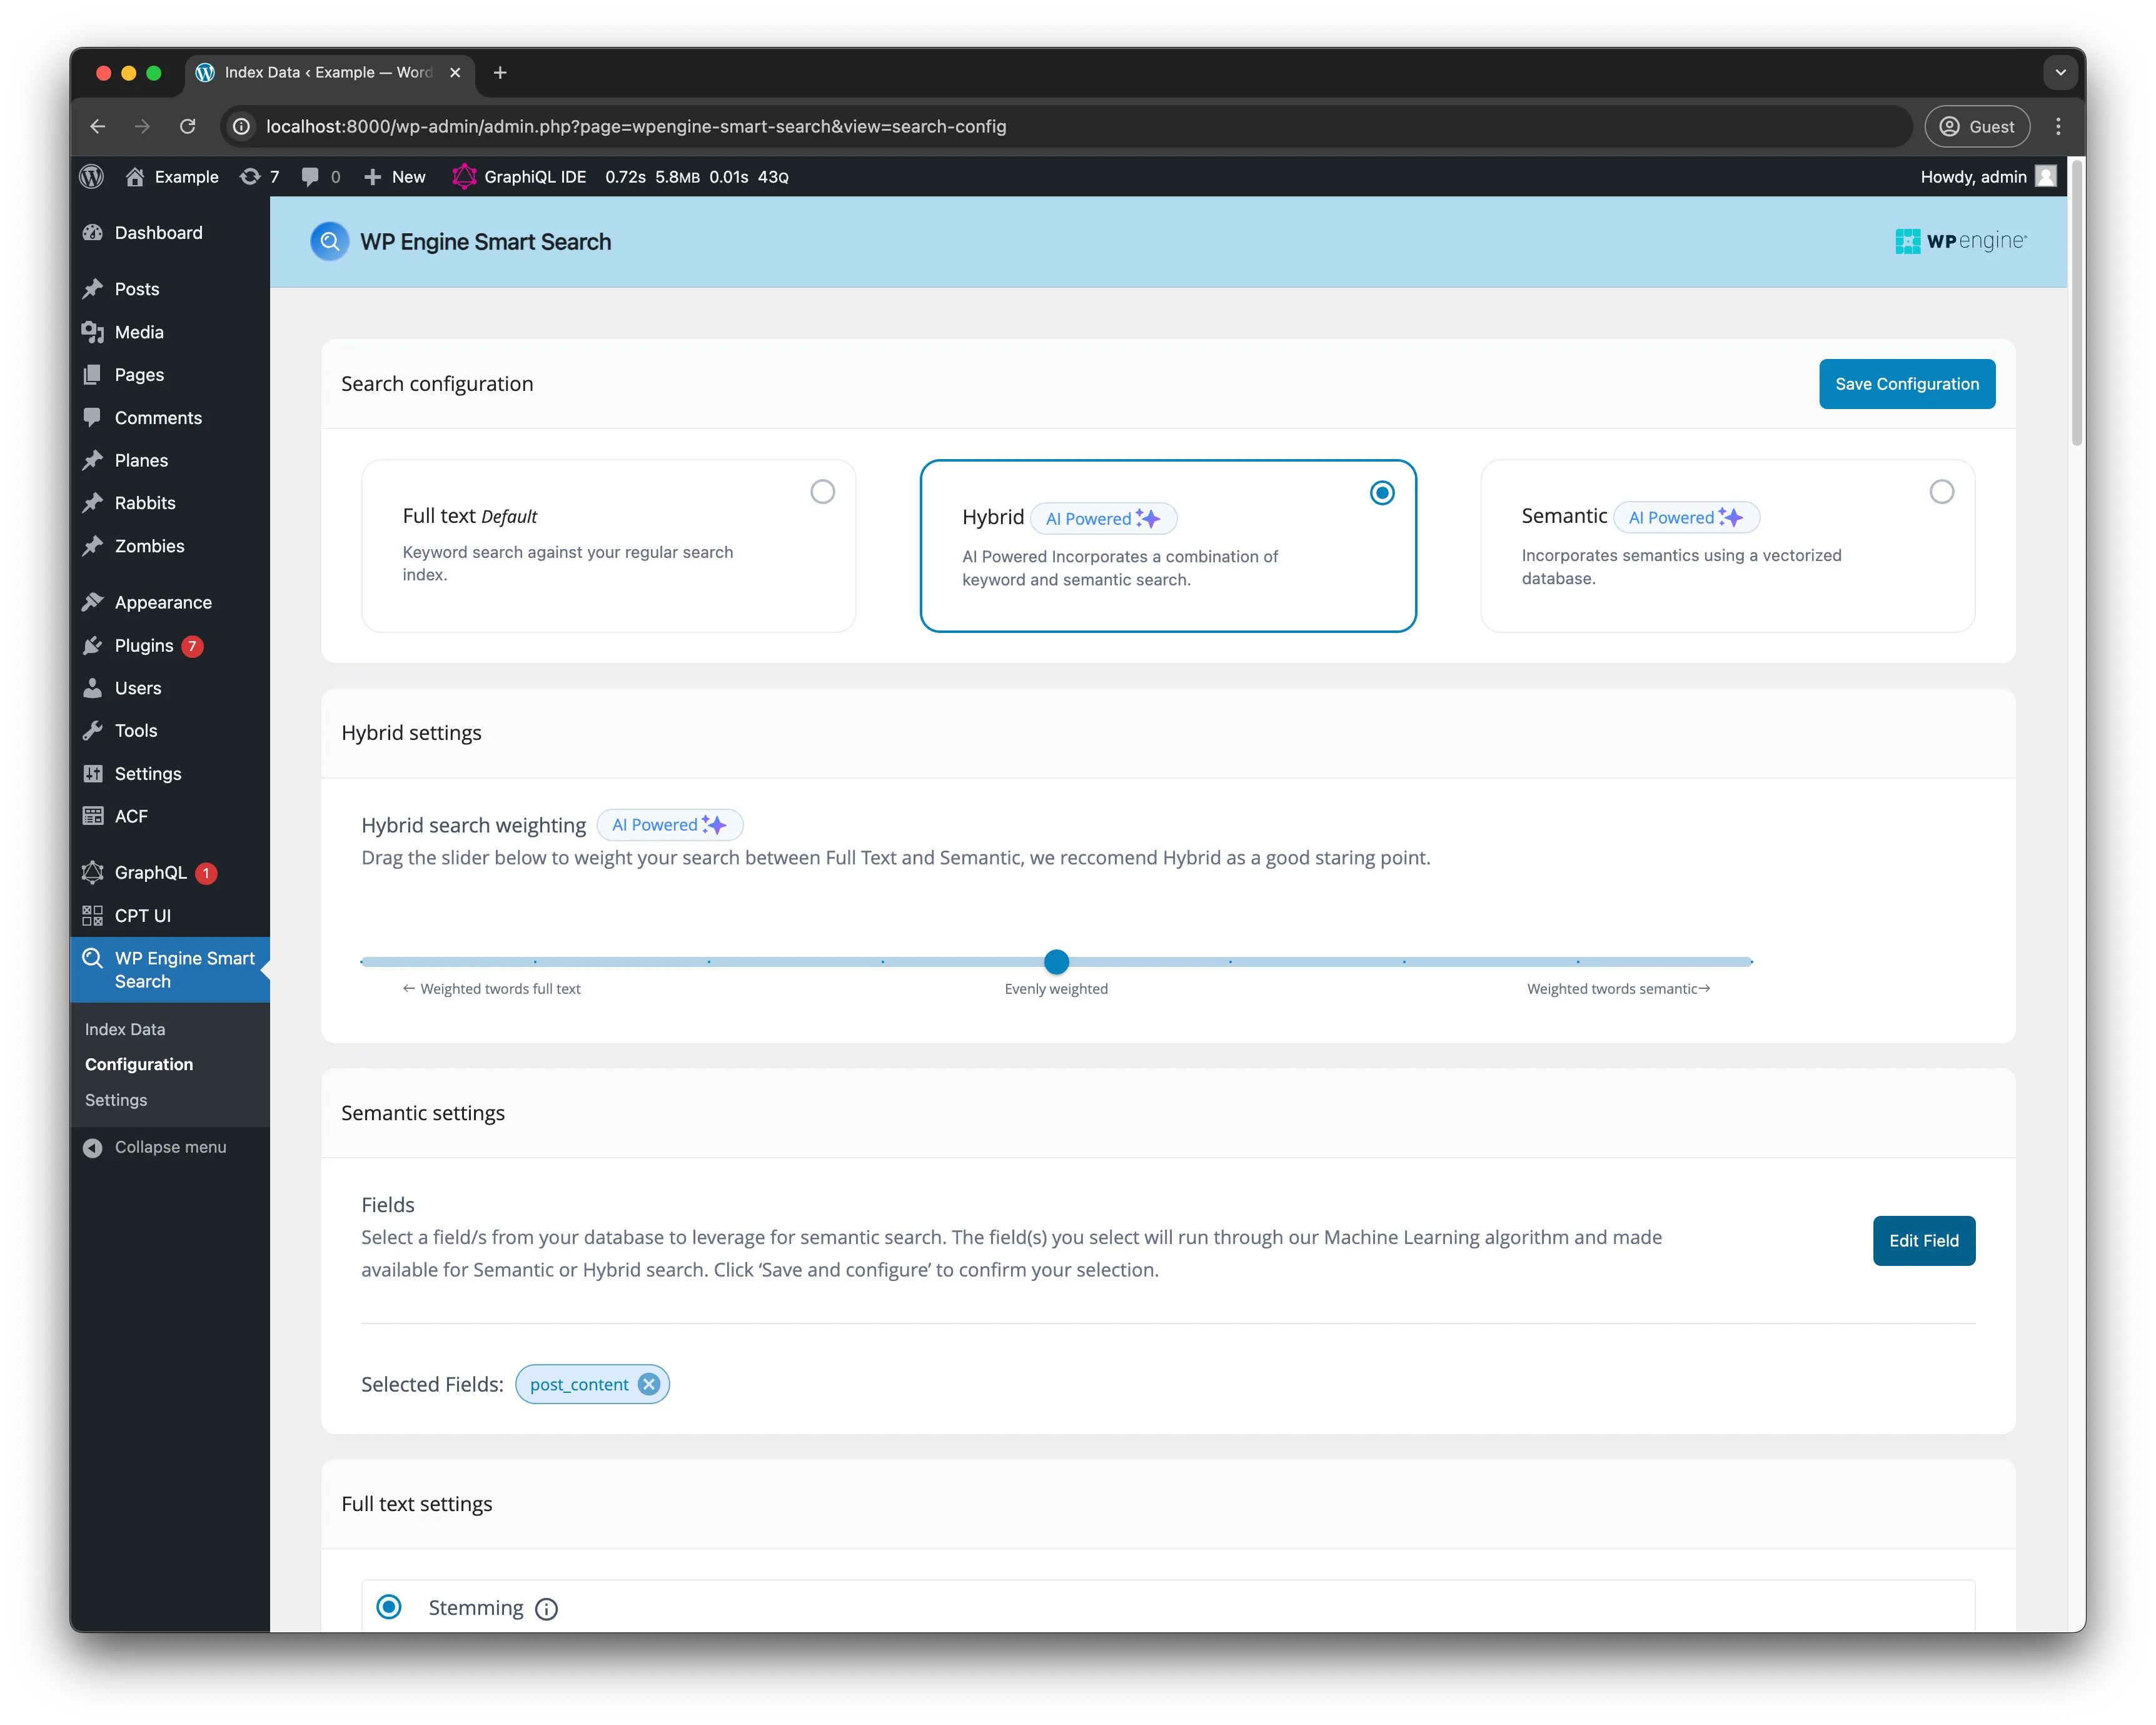
- Next, navigate to
Configuration, select theHybridcard, and add thepost_contentfield in theSemantic settingssection. We are going to use this field as our AI-powered field for similarity searches. Make sure to hitSave Configurationafterward.
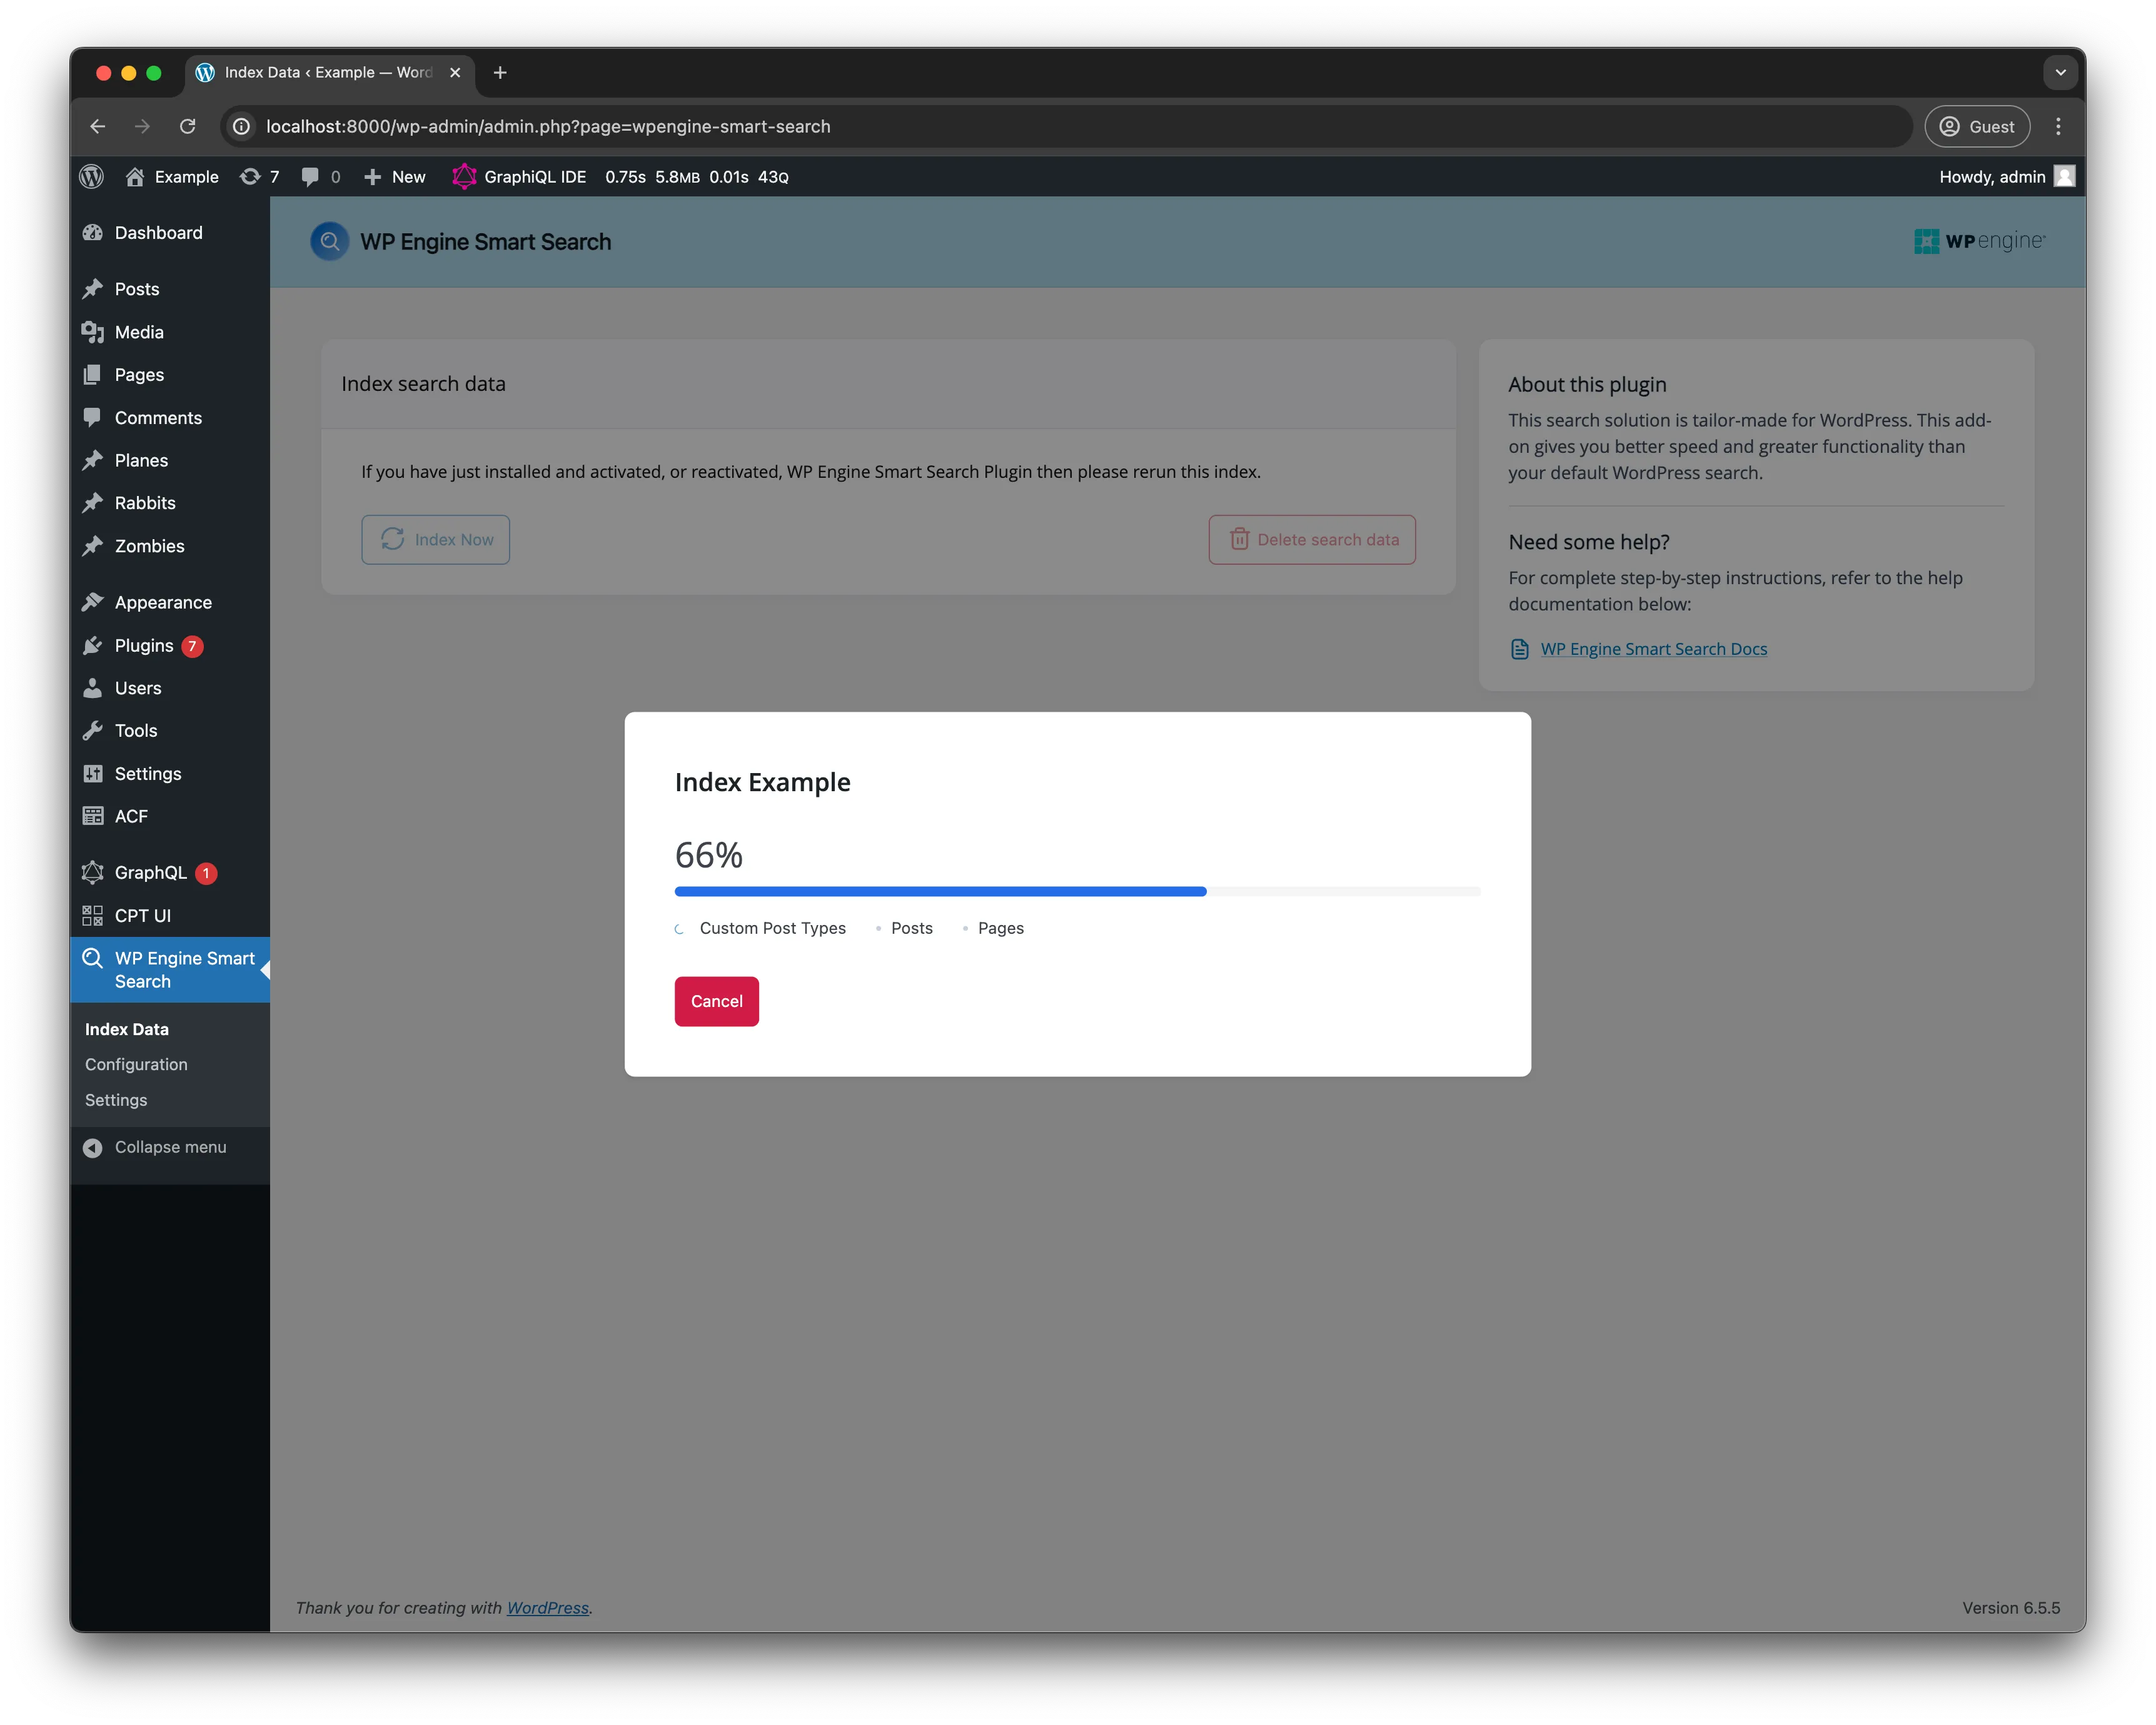
- After saving the configuration, head on over to the
Index datapage, then clickIndex Now. It will give you this success message once completed :
- Create an API account on Google Gemini (Or whatever AI model you choose, e.g., OpenAI API. Once created, navigate to your project’s dashboard. If you are using the Gemini API, go to the Google AI Studio. In your project’s dashboard, go to API Keys. You should see a page like this:
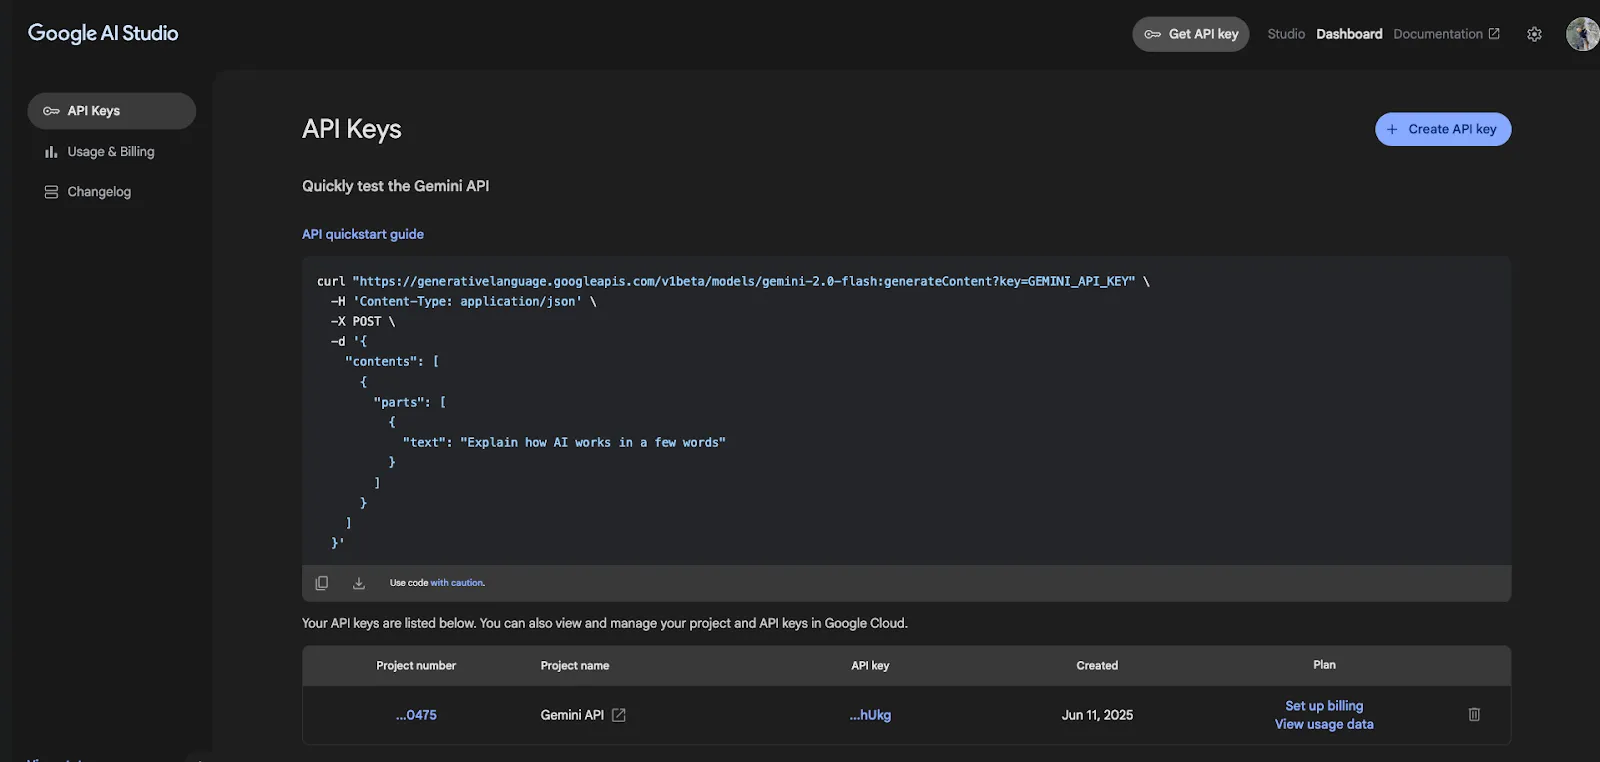
Generate a new key, copy, and save your API key because we will need this later. The API key is free on Google Gemini, but the free tier has limits.
- Head over to your terminal or CLI and create a new Next.js project by pasting this utility command in:
npx create-next-app@latest name-of-your-app
You will receive prompts in the terminal asking you how you want your Next.js app scaffolded. Answer them accordingly:
Would you like to use TypeScript? YesWold you like to use ESLint? YesWould you like to use Tailwind CSS? YesWould you like to use the `src/` directory? YesWould you like to use App Router? YesWould you like to customize the default import alias (@/*)? NoOnce your Next.js app is created, you will need to install the dependencies needed to ensure our app works. Copy and paste this command in your terminal:
npm install @ai-sdk/google ai openai-edge react-icons react-markdown
Once the Next project is done scaffolding, cd into the project and then open up your code editor.
- In your Next.js project, create a
.env.localfile with the following environment variables:
GOOGLE_GENERATIVE_AI_API_KEY="<your key here>"(if you chose another AI model, you can name this key whatever you want)SMART_SEARCH_URL="<your smart search url here>"SMART_SEARCH_ACCESS_TOKEN="<your smart search access token here>"Make Requests to the WP Engine Smart Search API
Section titled “Make Requests to the WP Engine Smart Search API”The first thing we need to do is set up the request to the Smart Search API using the Similarity query. Create a file in the src/app directory called utils/context.ts. Copy the code below and paste it into that file:
// These are the types that are used in the `getContext` functiontype Doc = {  id: string;  data: Record<string, any>;  score: number;};
type Similarity = {  total: number;  docs: Doc[];};
type Response = {  data: {    similarity: Similarity;  };  errors?: Array<{ message: string }>;};
// The function `getContext` is used to retrieve the context of a given messageexport const getContext = async (message: string): Promise<Response> => {  const url = process.env.SMART_SEARCH_URL ?? '';  const token = process.env.SMART_SEARCH_ACCESS_TOKEN ?? '';
  const query = `query GetContext($message: String!, $field: String!) {    similarity(      input: {        nearest: {          text: $message,          field: $field        }      }) {      total      docs {        id        data        score      }    }  }`;
  const variables = {    message,    field: 'post_content',  };
  const response = await fetch(url, {    method: 'POST',    headers: {      'Content-Type': 'application/json',      Authorization: `Bearer ${token}`,    },    body: JSON.stringify({ query, variables }),  });
  return await response.json();};
Creating the “R” in RAG
Section titled “Creating the “R” in RAG”Each tool is defined with the tool helper and Zod validation, handling errors and formatting results before returning.
The next file we need to create is the “Retrieval” portion in our RAG pipeline. Create a tools.ts file in the utils folder and copy and paste this code block:
import { tool } from 'ai';import { z } from 'zod';import { getContext } from '@/app/utils/context';
// Define the search toolexport const smartSearchTool = tool({  description:    'Search for information about TV shows using WP Engine Smart Search. Use this to answer questions about TV shows, their content, characters, plots, etc., when the information is not already known.',  parameters: z.object({    query: z      .string()      .describe(        "The search query to find relevant TV show information based on the user's question.",      ),  }),  execute: async ({ query }: { query: string }) => {    console.log(`[Tool Execution] Searching with query: "${query}"`);    try {      const context = await getContext(query);
      if (context.errors && context.errors.length > 0) {        console.error(          '[Tool Execution] Error fetching context:',          context.errors,        );        // Return a structured error message that the LLM can understand        return {          error: `Error fetching context: ${context.errors[0].message}`,        };      }
      if (        !context.data?.similarity?.docs ||        context.data.similarity.docs.length === 0      ) {        console.log('[Tool Execution] No documents found for query:', query);        return {          searchResults: 'No relevant information found for your query.',        };      }
      const formattedResults = context.data.similarity.docs.map((doc) => {        if (!doc) {          return {};        }
        return {          id: doc.id,          title: doc.data.post_title,          content: doc.data.post_content,          url: doc.data.post_url,          categories: doc.data.categories.map((category: any) => category.name),          searchScore: doc.score,        };      });
      // console.log("[Tool Execution] Search results:", formattedResults);
      return { searchResults: formattedResults }; // Return the formatted string    } catch (error: any) {      console.error('[Tool Execution] Exception:', error);      return { error: `An error occurred while searching: ${error.message}` };    }  },});
export const weatherTool = tool({  description:    'Get the current weather information for a specific location. Use this to answer questions about the weather in different cities.',  parameters: z.object({    location: z      .string()      .describe(        'The location for which to get the current weather information.',      ),  }),  execute: async ({ location }: { location: string }) => {    console.log(`[Tool Execution] Getting weather for location: "${location}"`);    try {      // Simulate fetching weather data      const weatherData = {        location,        temperature: '22°C',        condition: 'Sunny',        humidity: '60%',        windSpeed: '15 km/h',      };      const formattedWeather = `The current weather in ${weatherData.location} is ${weatherData.temperature} with ${weatherData.condition}. Humidity is at ${weatherData.humidity} and wind speed is ${weatherData.windSpeed}.`;      return { weather: formattedWeather };    } catch (error: any) {      console.error('[Tool Execution] Exception:', error);      return {        error: `An error occurred while fetching weather data: ${error.message}`,      };    }  },});
API Endpoint for Chat UI – The AG in RAG
Section titled “API Endpoint for Chat UI – The AG in RAG”This edge function converts user messages, invokes our smartSearchTool and weatherTool, and streams a Google Gemini response back to the client.
Next, let’s create the chat endpoint for the Chat UI, which is the “AG” in RAG. In the src/app directory, create an api/chat/ subfolder, then add a route.ts file in there. Copy and paste this code into the file:
// IMPORTANT! Set the runtime to edgeexport const runtime = 'edge';
import { convertToCoreMessages, Message, streamText } from 'ai';import { createGoogleGenerativeAI } from '@ai-sdk/google';
import { smartSearchTool, weatherTool } from '@/app/utils/tools';
/** * Initialize the Google Generative AI API */const google = createGoogleGenerativeAI();
export async function POST(req: Request) {  try {    const { messages }: { messages: Array<Message> } = await req.json();
    const coreMessages = convertToCoreMessages(messages);
    const smartSearchPrompt = `    - You can use the 'smartSearchTool' to find information relating to tv shows.      - WP Engine Smart Search is a powerful tool for finding information about TV shows.      - After the 'smartSearchTool' provides results (even if it's an error or no information found)      - You MUST then formulate a conversational response to the user based on those results but also use the tool if the users query is deemed plausible.        - If search results are found, summarize them for the user.        - If no information is found or an error occurs, inform the user clearly.`;
    const systemPromptContent = `    - You are a friendly and helpful AI assistant    - You can use the 'weatherTool' to provide current weather information for a specific location.    - Do not invent information. Stick to the data provided by the tool.`;
    const response = streamText({      model: google('models/gemini-2.0-flash'),      system: [smartSearchPrompt, systemPromptContent].join('\n'),      messages: coreMessages,      tools: {        smartSearchTool,        weatherTool,      },      onStepFinish: async (result) => {        // Log token usage for each step        if (result.usage) {          console.log(            `[Token Usage] Prompt tokens: ${result.usage.promptTokens}, Completion tokens: ${result.usage.completionTokens}, Total tokens: ${result.usage.totalTokens}`,          );        }      },      maxSteps: 5,    });    // Convert the response into a friendly text-stream    return response.toDataStreamResponse({});  } catch (e) {    throw e;  }}
Create UI Components for Chat Interface
Section titled “Create UI Components for Chat Interface”The Chat.tsx file
Section titled “The Chat.tsx file”Now, let’s create the chat interface. In the src/app directory, create a components folder. Then create a Chat.tsx file. Copy and paste this code block in that file:
"use client";
import React, { ChangeEvent } from "react";import Messages from "./Messages";import { Message } from "ai/react";import LoadingIcon from "../Icons/LoadingIcon";import ChatInput from "./ChatInput";
interface Chat {  input: string;  handleInputChange: (e: ChangeEvent<HTMLInputElement>) => void;  handleMessageSubmit: (e: React.FormEvent<HTMLFormElement>) => void;  messages: Message[];  status: "submitted" | "streaming" | "ready" | "error";}
const Chat: React.FC<Chat> = ({  input,  handleInputChange,  handleMessageSubmit,  messages,  status,}) => {  return (    <div id="chat" className="flex flex-col w-full mx-2">      <Messages messages={messages} />      {status === "submitted" && <LoadingIcon />}      <form        onSubmit={handleMessageSubmit}        className="ml-1 mt-5 mb-5 relative rounded-lg"      >        <ChatInput input={input} handleInputChange={handleInputChange} />      </form>    </div>  );};
export default Chat;
This file defines a client-side React Chat component that ties together your message list, input field, and loading indicator.
Messages Component
Section titled “Messages Component”Staying in the src/app/components directory, create a Messages.tsx file. Copy and paste this code block in:
import { Message } from "ai";import { useEffect, useRef } from "react";import ReactMarkdown from "react-markdown";
export default function Messages({ messages }: { messages: Message[] }) {  const messagesEndRef = useRef<HTMLDivElement | null>(null);  useEffect(() => {    messagesEndRef.current?.scrollIntoView({ behavior: "smooth" });  }, [messages]);  return (    <div      className="border-1 border-gray-100 overflow-y-scroll flex-grow flex-col justify-end p-1"      style={{ scrollbarWidth: "none" }}    >      {messages.map((msg, index) => (        <div          key={index}          className={`${            msg.role === "assistant" ? "bg-green-500" : "bg-blue-500"          } my-2 p-3 shadow-md hover:shadow-lg transition-shadow duration-200 flex slide-in-bottom bg-blue-500 border border-gray-900 message-glow`}        >          <div className="ml- rounded-tl-lg  p-2 border-r flex items-center">            {msg.role === "assistant" ? "🤖" : "🧒🏻"}          </div>          <div className="ml-2 text-white">            <ReactMarkdown>{msg.content}</ReactMarkdown>          </div>        </div>      ))}      <div ref={messagesEndRef} />    </div>  );}
The Messages component renders a scrollable list of chat messages, automatically keeping the view scrolled to the latest entry.
Chat Input Component
Section titled “Chat Input Component”Lastly, staying in the components/Chat directory, we have the chat input. Create a ChatInput.tsx file and copy and paste this code block in:
import { ChangeEvent } from "react";import SendIcon from "../Icons/SendIcon";
interface InputProps {  input: string;  handleInputChange: (e: ChangeEvent<HTMLInputElement>) => void;}
function Input({ input, handleInputChange }: InputProps) {  return (    <div className="bg-gray-800 p-4 rounded-xl shadow-lg w-full max-w-2xl mx-auto">      <input        type="text"        value={input}        onChange={handleInputChange}        placeholder={"Ask Smart Search about TV shows..."}        className="w-full bg-transparent text-gray-200 placeholder-gray-500 focus:outline-none text-md mb-3"      />      <div className="flex">        <button          type="submit"          className="p-1 hover:bg-gray-700 rounded-md transition-colors ml-auto"          aria-label="Send message"          disabled={!input.trim()}        >          <SendIcon />        </button>      </div>    </div>  );}
export default Input;
This file exports an Input component that renders a styled text field and send button for your chat UI.
Update the page.tsx template
Section titled “Update the page.tsx template”We need to modify the src/app/page.tsx file to add the Chat component to the page. In the page.tsx file, copy and paste this code:
"use client";import Chat from "./components/Chat/Chat";import { useChat } from "@ai-sdk/react";import { useEffect } from "react";
const Page: React.FC = () => {  const {    messages,    input,    handleInputChange,    handleSubmit,    setMessages,    status,  } = useChat();
  useEffect(() => {    if (messages.length < 1) {      setMessages([        {          role: "assistant",          content: "Welcome to the Smart Search chatbot!",          id: "welcome",        },      ]);    }  }, [messages, setMessages]);
  return (    <div className="flex flex-col justify-between h-screen bg-white mx-auto max-w-full">      <div className="flex w-full flex-grow overflow-hidden relative bg-slate-950">        <Chat          input={input}          handleInputChange={handleInputChange}          handleMessageSubmit={handleSubmit}          messages={messages}          status={status}        />      </div>    </div>  );};
export default Page;
This file defines our page component that leverages the useChat hook from the @ai-sdk/react package to manage chat state, including messages, input text, submission handler, and status.
Update the layout.tsx file with metadata
Section titled “Update the layout.tsx file with metadata”We need to add metadata to our layout. Copy and paste this code block in the src/app/layout.tsx file:
import type { Metadata } from "next";import { Inter } from "next/font/google";import "./globals.css";
const inter = Inter({ subsets: ["latin"] });
export const metadata: Metadata = {  title: "Smart Search RAG",  description: "Lets make a chatbot with Smart Search",};
export default function RootLayout({  children,}: Readonly<{  children: React.ReactNode;}>) {  return (    <html lang="en">      <body className={inter.className}>{children}</body>    </html>  );}
This file configures the global layout and metadata for the app.
CSS Note: The last thing to add for the styling is the
globals.cssfile. Visit the code block here and copy and paste it into your project.
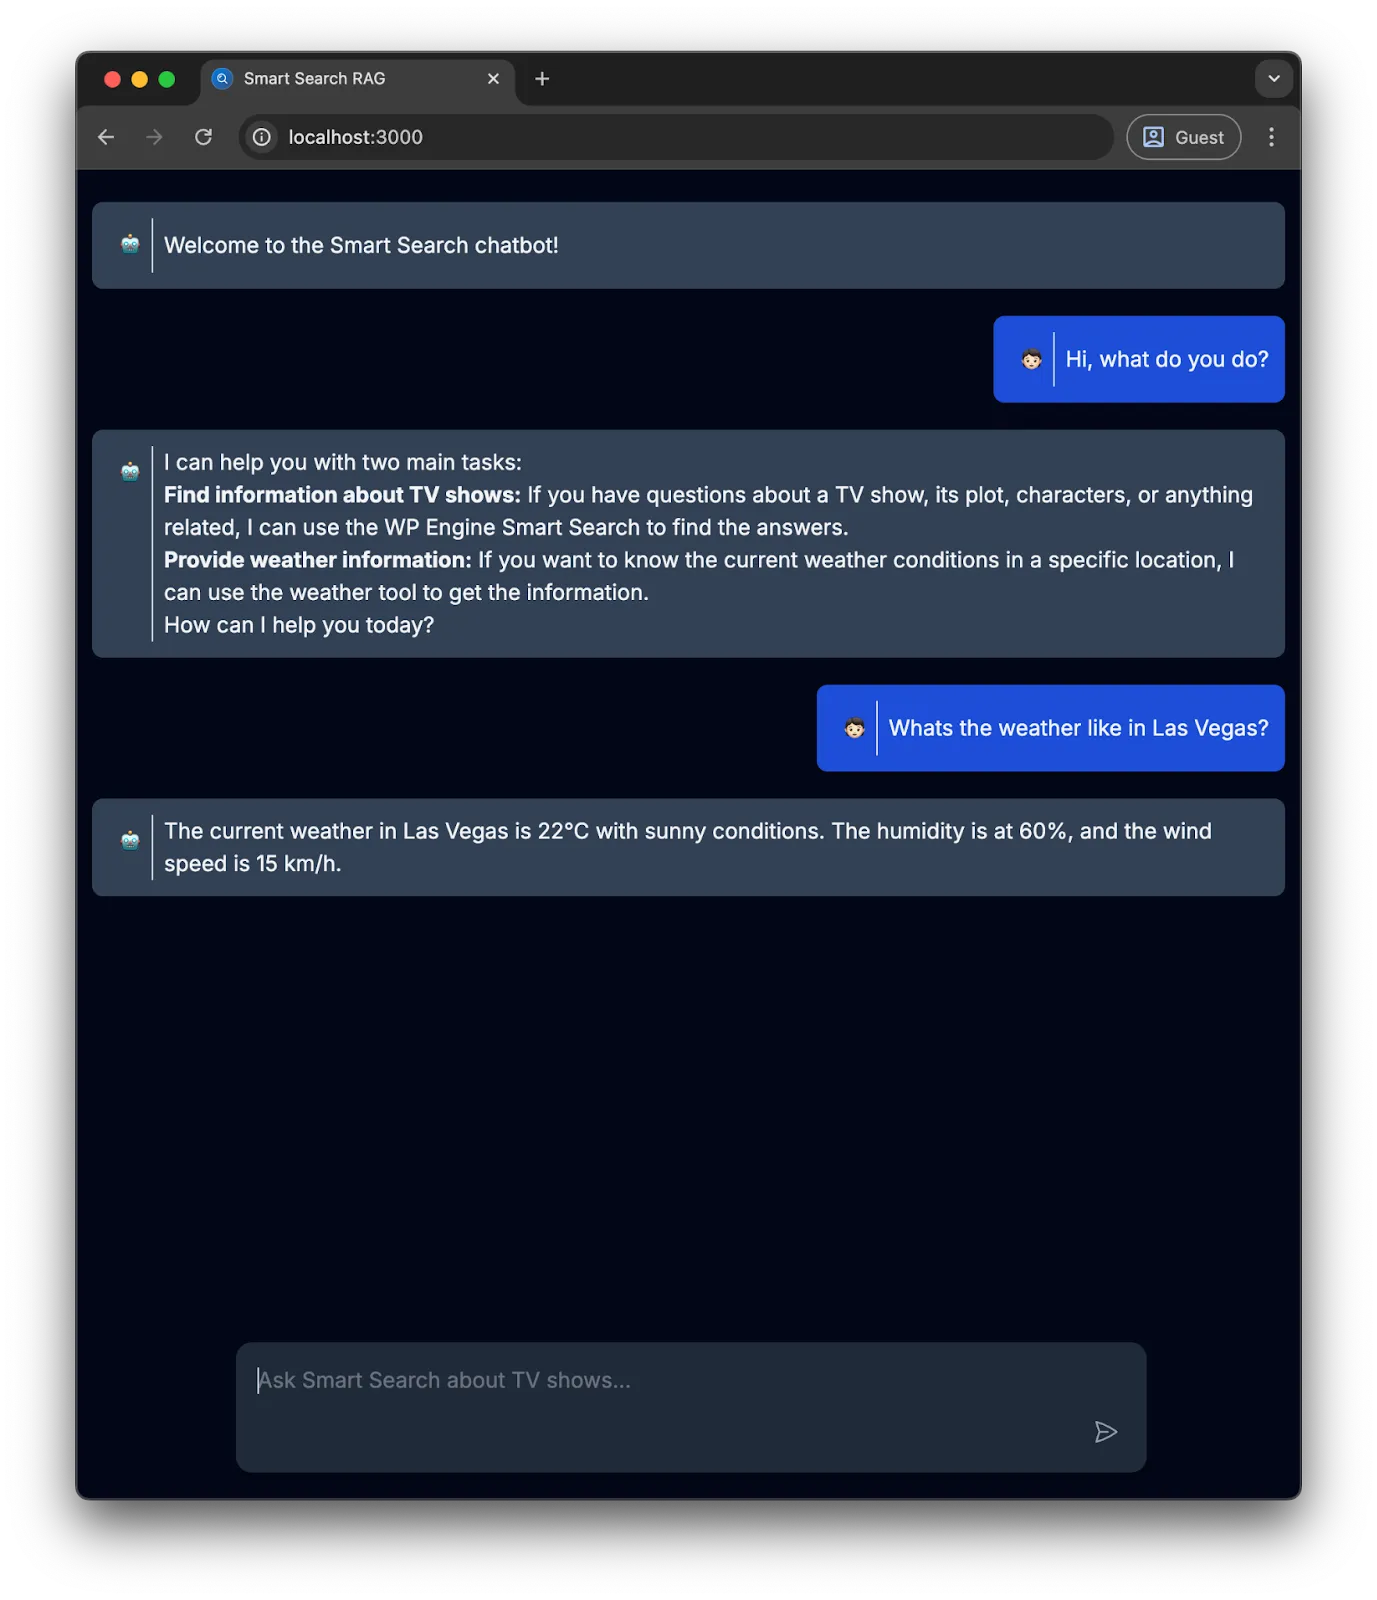
Test the ChatBot
Section titled “Test the ChatBot”The chatbot should be completed and testable in this state. In your terminal, run npm run dev and navigate to http://localhost:3000. Try asking the chatbot a few questions. You should see this in your browser:
Embedding the chatbot on a WordPress Site
Section titled “Embedding the chatbot on a WordPress Site”To seamlessly integrate our chat bot into a WordPress site we will create two essential files: embed.js and embed.css. These files will reside in the public directory of our Next.js application. By doing this, we can easily embed the chat bot using a simple script tag in the WordPress site.
Create embed.js
Section titled “Create embed.js”First, let’s create the embed.js file in the public directory. This JavaScript file will handle the initialization and toggling of the embedded chatbot.
(function () {  const scriptUrl = new URL(document.currentScript.src);  const baseUrl = `${scriptUrl.protocol}//${scriptUrl.host}`;
  function createChatIcon() {    var chatIcon = document.createElement('div');    chatIcon.id = 'chat-icon';    chatIcon.innerHTML = 'Chat';    chatIcon.addEventListener('click', function (event) {      event.stopPropagation();      toggleChatIframe();    });
    document.body.appendChild(chatIcon);  }
  function toggleChatIframe() {    var iframe = document.getElementById('chat-iframe');    iframe.classList.toggle('hidden');  }
  function renderChatIframe() {    iframe = document.createElement('iframe');    iframe.id = 'chat-iframe';    iframe.src = baseUrl; // Replace with your chat URL    iframe.classList.add('hidden');    document.body.appendChild(iframe);  }
  function loadCss() {    const link = document.createElement('link');    link.rel = 'stylesheet';    link.href = `${baseUrl}/embed.css`;
    document.head.appendChild(link);  }
  function handleClose() {    document.addEventListener('click', function () {      var iframe = document.getElementById('chat-iframe');      if (iframe.classList.contains('hidden')) return;      iframe.classList.add('hidden');    });  }
  loadCss();  renderChatIframe();  createChatIcon();  handleClose();})();
Explanation:
- Initialization: The script starts by determining the base URL from where it is being loaded.
- Chat Icon Creation: It creates a chat icon (div) and adds it to the document body. Clicking this icon toggles the visibility of the chat iframe.
- Chat Iframe Rendering: An iframe is created and appended to the document body. The iframe loads the chatbot from the specified URL.
- CSS Loading: The necessary CSS file (embed.css) is dynamically loaded and appended to the document head.
- Close Handling: Clicking outside the iframe hides it.
Create embed.css
Section titled “Create embed.css”Next, let’s create the embed.css file in the public directory. This CSS file will style the chat icon and the chat iframe.
#chat-icon {  position: fixed;  display: flex;  align-items: center;  justify-content: center;  bottom: 10px;  right: 10px;  width: 70px;  height: 70px;  border-radius: 50%;  background-color: rgb(59 130 246);  color: white;  font-size: 12px;  box-shadow: 0 2px 4px rgba(0, 0, 0, 0.5);}
#chat-icon:hover {  cursor: pointer;  background-color: rgb(39, 90, 216);  animation: hoverAnimation 1s;}
@keyframes hoverAnimation {  0% {    background-color: rgb(59, 130, 246);  }  100% {    background-color: rgb(39, 90, 216);  }}
#chat-iframe {  z-index: 9999;  position: fixed;  bottom: 113px;  width: 600px;  height: 60%;  right: 10px;  border: 1px solid #ccc;  box-shadow: -1px 2px 4px rgba(0, 0, 0, 0.5);  border-radius: 10px;}
.hidden {  display: none;}
Explanation:
- Chat Icon Styling: The chat icon is styled to be fixed at the bottom-right corner, with a background color, shadow, and hover effect.
- Chat Iframe Styling: The iframe is styled to appear fixed above the chat icon, with a border, shadow, and rounded corners.
- Hidden Class: This class is used to toggle the visibility of the iframe.
Embed chatbot in WordPress
Section titled “Embed chatbot in WordPress”To embed the chatbot on a WordPress site, add the following action to your theme’s functions.php file:
add_action( 'wp_enqueue_scripts', function () { wp_enqueue_script( 'embed-chatbot', 'http://{NEXT_JS_APP_URL}/embed.js', array(), null, true ); });Then navigate back to your WordPress site:
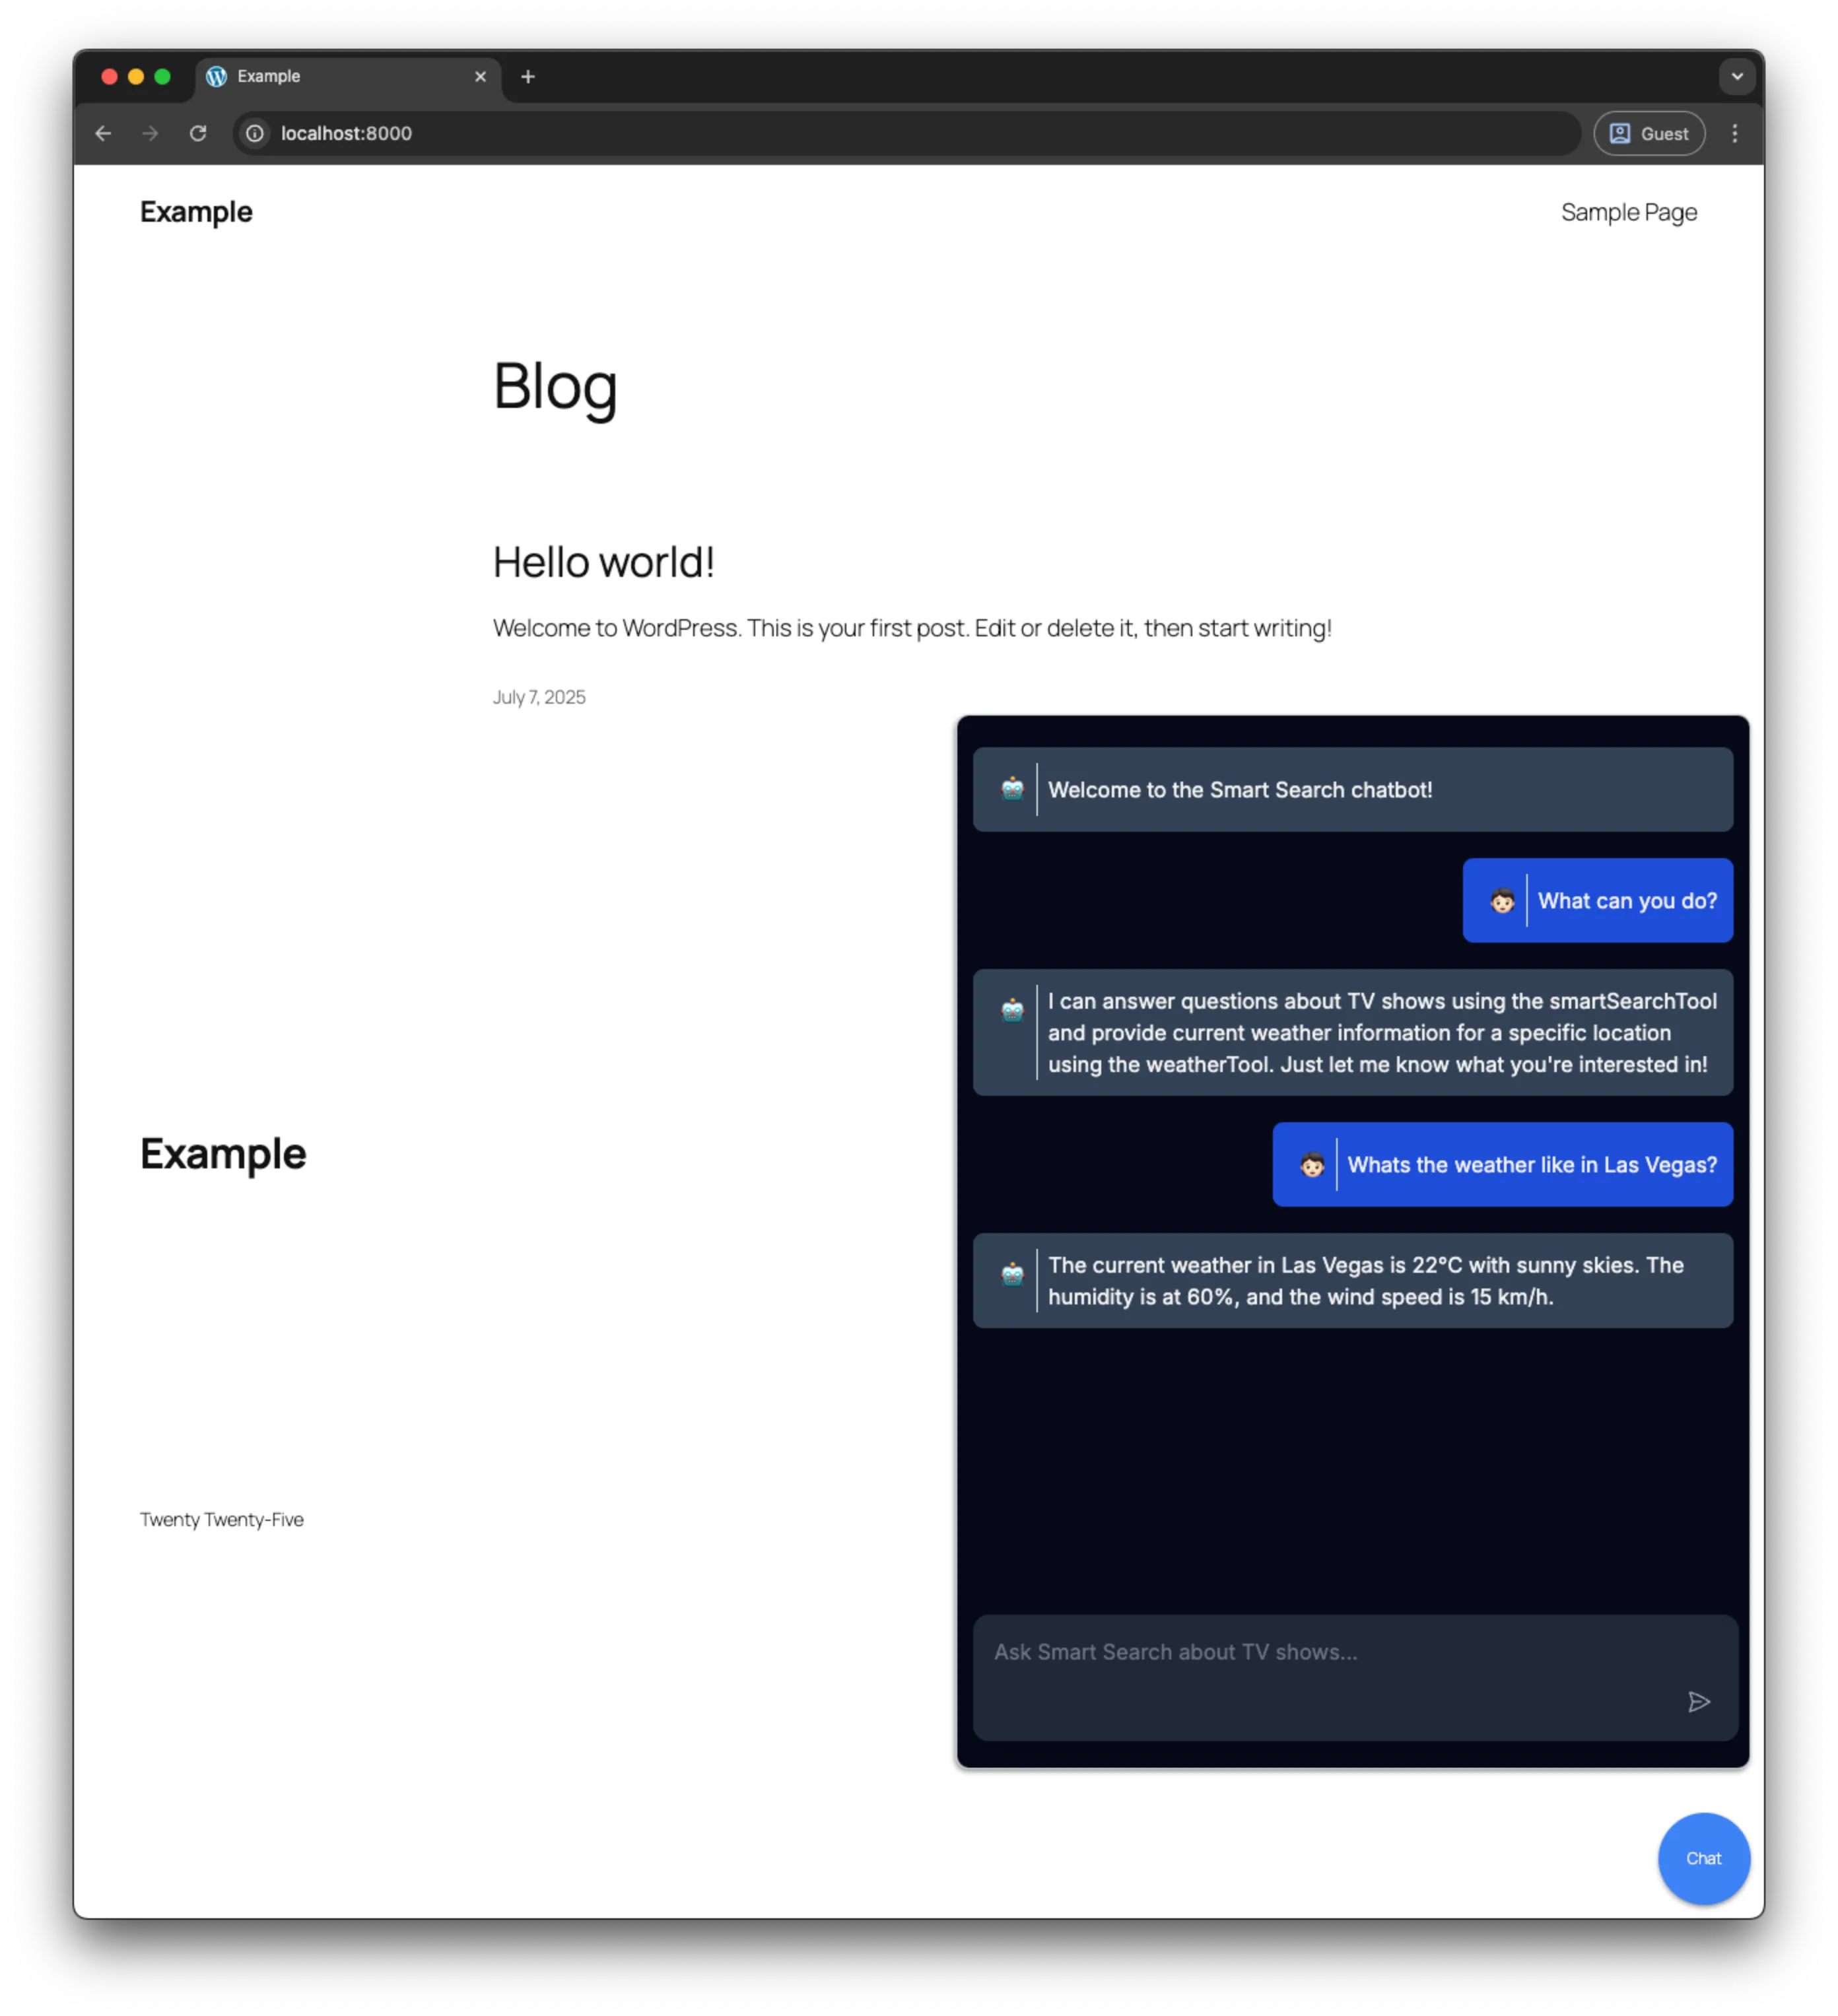
By adding embed.js and embed.css to the public directory, we have created a straightforward method to embed our chatbot on a WordPress site, or any other site. This approach ensures a smooth integration, providing a fully functional and styled chatbot with minimal effort.
Conclusion
Section titled “Conclusion”In conclusion, integrating a chatbot into a WordPress site, or indeed any website, can significantly enhance user engagement and provide immediate assistance to visitors.
By following the steps outlined in this guide, developers can seamlessly embed a custom chatbot into their site, leveraging the power of modern web technologies like Next.js. The process involves creating a chat interface, styling it for a consistent user experience, and embedding it into a site using straightforward WordPress actions. This approach not only simplifies the integration process but also offers a high degree of customization, allowing developers to tailor the chatbot’s appearance and functionality to meet their specific needs.
As chat bots continue to evolve, they represent a valuable tool for improving user interaction, providing support, and driving engagement on digital platforms.
Resources
Section titled “Resources”- Chat app source code - Source code for the chatbot written in this tutorial.