Astro Framework Guide
Introduction
Section titled “Introduction”Astro is a sever-first framework for creating fast content-focused sites. You can run the framework either in SSR or SSG mode, and you can incorporate any of the popular frontend frameworks, like React, Vue, Svelte, etc. Astro is best used for content-focused sites, not web applications. Check out their docs for some more details on when you should and should not use Astro in your project.
Deploy Steps
Section titled “Deploy Steps”To get started, you can run the following command to create a new Astro project and the follow the steps in their installation guide:
npm create astro@latest
Or, if you want to start with a template designed specifically for headless WordPress, you can clone this starter template:
git clone https://github.com/JEverhart383/astro-wordpress-starter.git
After you have created your application, cd into your project directory:
cd <your project directory>
Push Initial Commits to Your Repository
Section titled “Push Initial Commits to Your Repository”To deploy your project to our Headless Platform, it will need to be available on a remote GitHub, Bitbucket or GitLab repository. The Astro installation process lets to initialize a local repository for the project.
Create a new remote repository, and then run the following commands to initialize and configure your local and remote repositories:
#Add remote repository$ git remote add origin https://<your-git-provider>/<username>/<repo>
# Stage all changed files$ git add -A
# Commit the files to the current branch$ git commit -m "initial commit"
# Push changes to remote repository$ git push -u origin main
Build Details
Section titled “Build Details”Astro has two main rendering output modes, server or static, but using prerender flags you can implement a hybrid rendering approach.
First, add the @astrojs/node adapter using the following command:
$ npx astro add nodeWith that adapter installed, update the Astro config file to tell the Node adapter to run in standalone mode:
import { defineConfig } from 'astro/config';import node from '@astrojs/node';
export default defineConfig({  output: 'server',  adapter: node({    mode: 'standalone',  }),});
To commit these changes to your repository, run the following commands:
# Stage all changed files$ git add -A
# Commit the files to the current branch$ git commit -m "add node adapter to astro config"
# Push changes to remote repository$ git push -u origin main
Package Scripts
Section titled “Package Scripts”Now that we’ve added the @astrojs/node adapter, we can add a start script to package.json. This ensures that our Headless Platform knows to start the project from the Node adapter we setup above.
{ "scripts": { ... "start": "node ./dist/server/entry.mjs" ... }}Don’t forget to commit this part as well:
# Stage all changed files$ git add -A
# Commit the files to the current branch$ git commit -m "replace start script in package.json"
# Push changes to remote repository$ git push -u origin main
Deploy Your Repository
Section titled “Deploy Your Repository”Once your project is in a remote repository, you can follow the directions in our getting started guide to deploy your project to our Headless Platform.
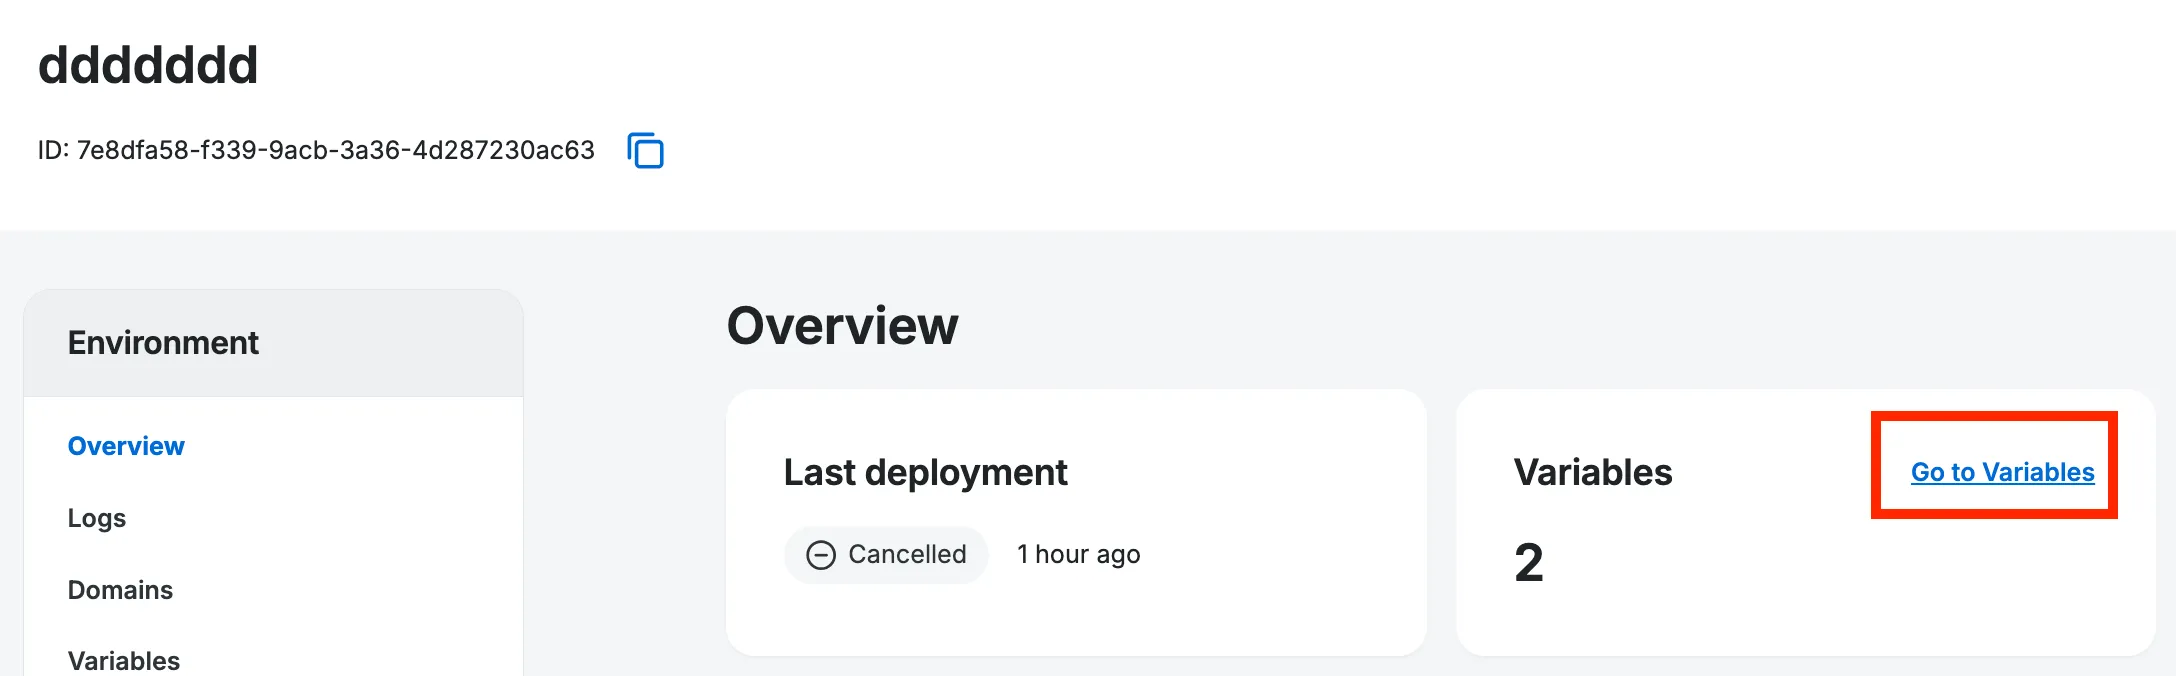
You will need to set the host in your WP Engine Portal to ensure that our Headless Platform can find the site when it is started. This is due to Astro’s Node adapter which listens to 127.0.0.1 (localhost) by default yet our Headless Platform looks for your site on 0.0.0.0. Here is how it’s done:
- Navigate to your site’s environment in the WP Engine Portal.
- Near the top of the environment page, click
Go to Variables.
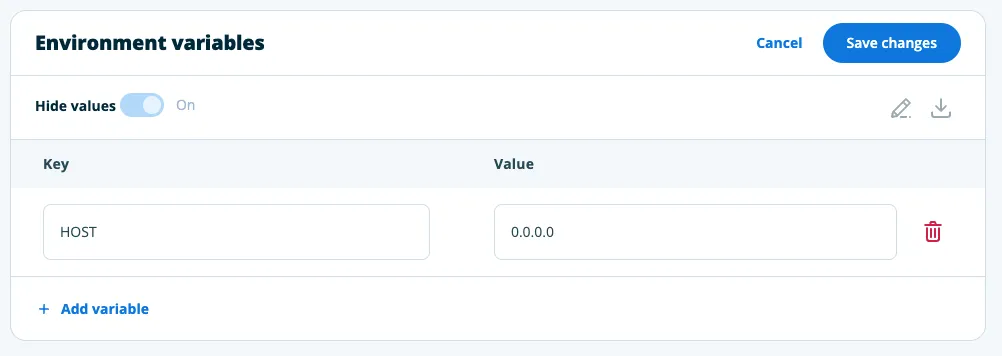
- On the “Variables” page select the large, blue button that says
Add environment variable. - On the “Add variable” screen, set the
KeytoHOSTand theValueto0.0.0.0. - Hit
Save changesto save the new variable.
When you save your changes you will be prompted to rebuild your site. If you have already built the site. You can safely do so if you have finished the rest of the deployment steps.
Best Practices
Section titled “Best Practices”Since most Astro implementations use SSG to generate your site at build time, we recommend implementing WPGraphQL Smart Cache on your WordPress environment to improve server performance.