


WP Engine Smart Search
WP Engine Smart Search is an Add-on for WP Engine customers that improves website searches for traditional and headless WordPress applications.
With WP Engine Smart Search, guide website visitors to the most important content with an intuitive, typo-tolerant search function that surfaces more relevant results — even custom post types. No coding necessary.
Smart Search licenses are currently available for purchase on Premium and Atlas plans. To purchase a license for a Premium plan, contact our Sales team or the Account Manager. For Atlas plans, Smart Search can be purchased from the Modify Plan page.
About
WP Engine Smart Search is an advanced search solution that’s designed to:
- Increase search result relevancy through content prioritizing and weighting
- Support advanced search query operators
- Add support for advanced WordPress data types
After purchasing and enabling on the environment of choice via the User Portal, the WP Engine Smart Search WordPress plugin will be installed automatically.
Licensing
Licenses are currently available for Premium and Atlas plans.
To purchase a license for a Premium plan, contact our Sales team or the Account Manager for assistance.
To purchase a license for an Atlas plan, either select WP Engine Smart Search as an Add-on when signing up for a plan, or purchase it through the Add-ons page of the existing plan.
After purchase, install WP Engine Smart Search on as many sites as the plan allows.
Enable
To enable WP Engine Smart Search on an environment:
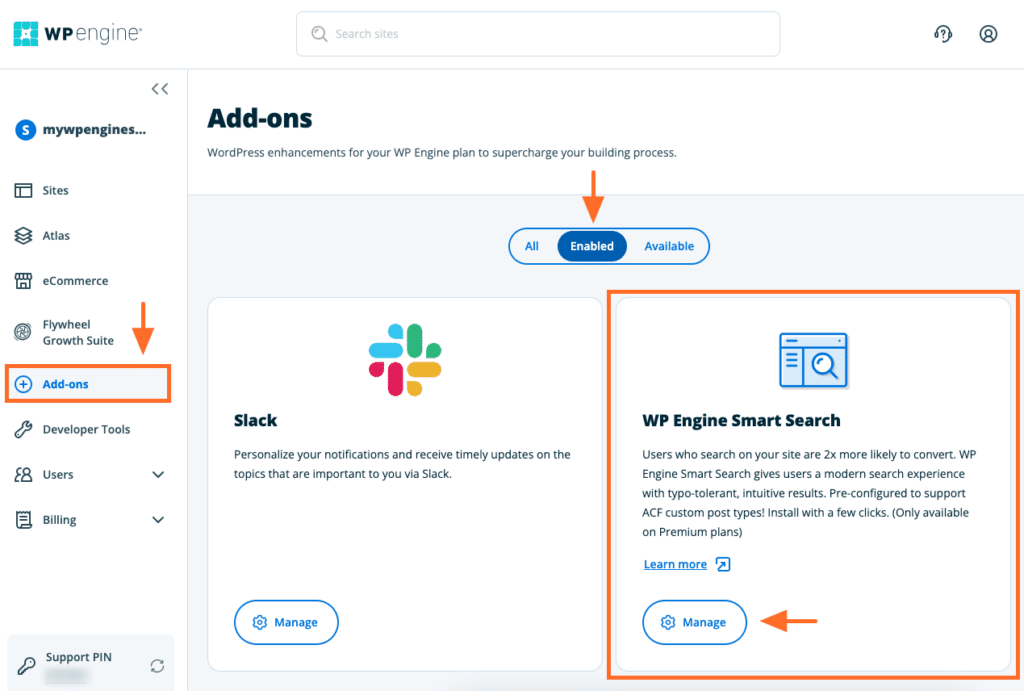
- Open the Add-ons page in the User Portal
- Click Manage under WP Engine Smart Search
- Or, access this page directly at: https://my.wpengine.com/products/smart_search
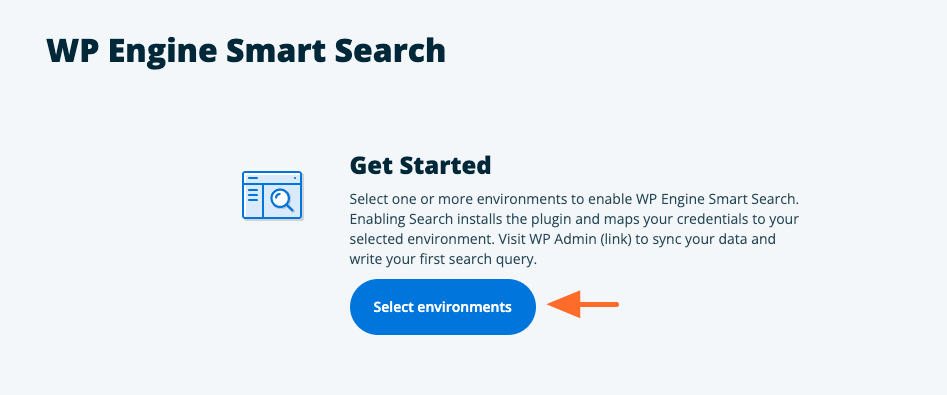
- Click Select environments
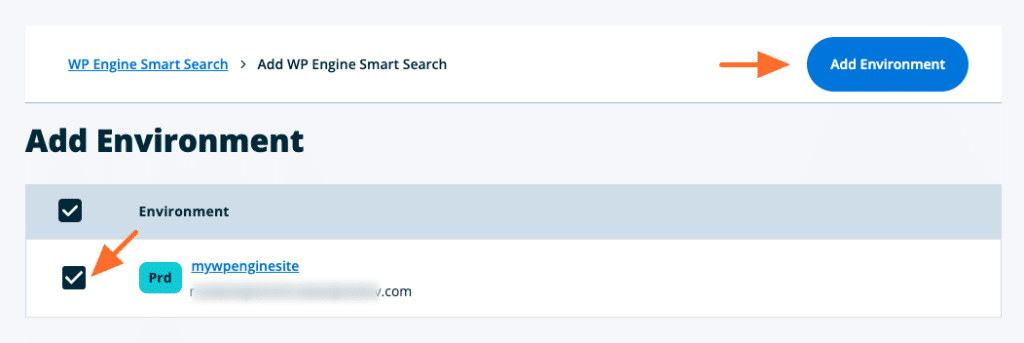
- Check the box(es) of the environment(s) and click Add environment
- Click Confirm to complete the licensing process
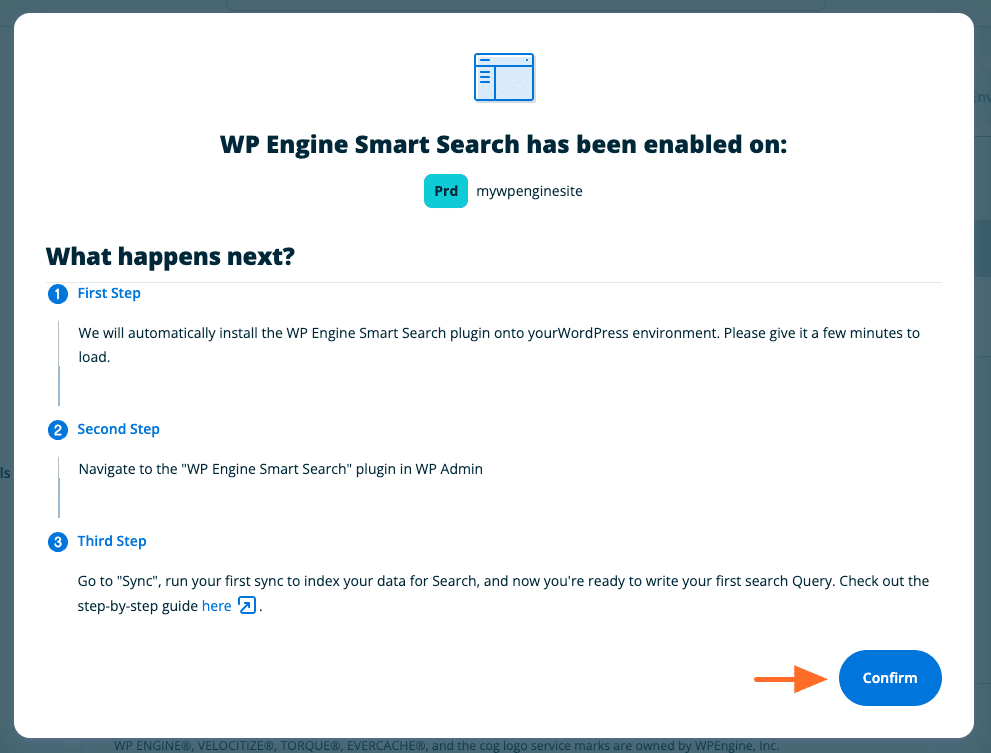
The plugin will be automatically installed on the selected environment(s).
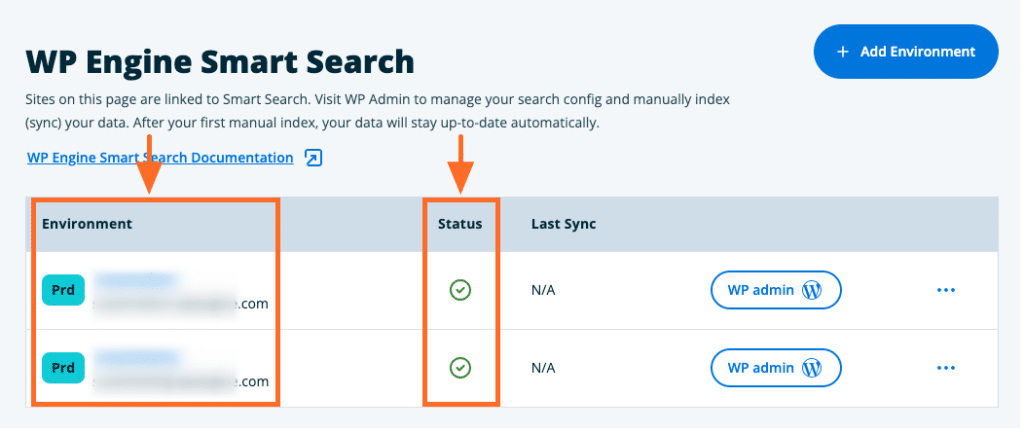
NOTE
It may take a few minutes for the plugin to install on the site. Wait for the Status icon to change from Pending to Ready to Use (indicated by a green check mark) before logging into the WP Admin. (This page will update automatically when the installation is complete.)
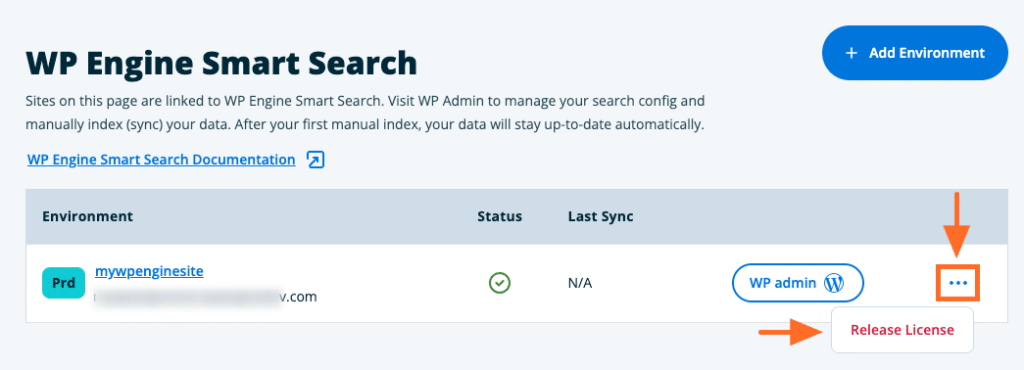
Remove a License
To remove a license from an environment:
- Open the Add-ons page in the User Portal
- Click Manage next to WP Engine Smart Search
- Or, access this page directly at: https://my.wpengine.com/products/smart_search
- Click the 3-dot Actions icon to reveal more options
- Click Release License
Content Sync
NOTE
WP Engine Smart Search requires a one-time content sync before adjusting any other plugin settings. Otherwise, errors may occur in future syncs.
A content (or data) sync sends all pre-existing content on the WordPress site to WP Engine Smart Search for indexing. This ensures the plugin knows exactly what content exists so it can serve the best results to site users.
To run the content sync:
- Log in to the WP Admin dashboard
- Go to WP Engine Smart Search > Sync
- Click Synchronize Now
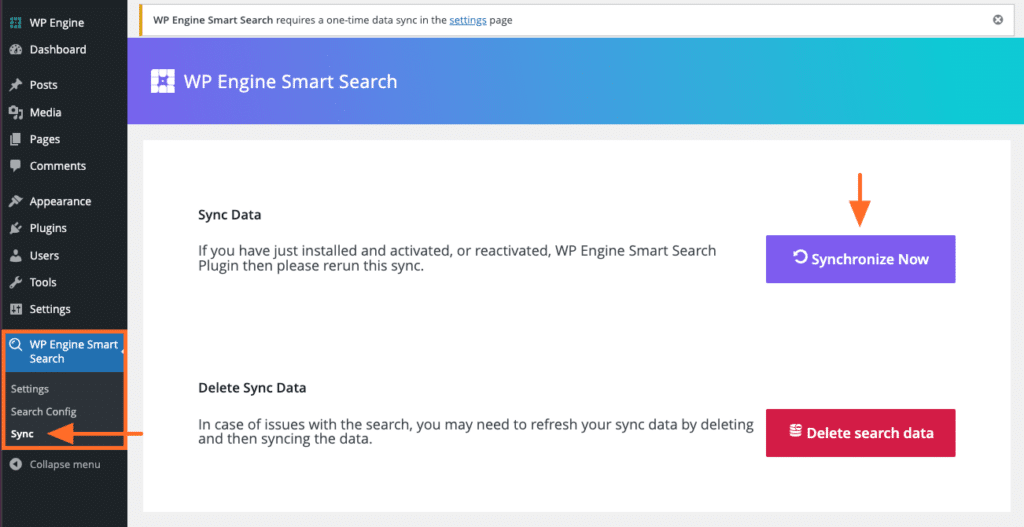
This sync can take some time to complete, especially on websites with large amounts of data (up to and beyond 30 minutes for the largest websites so please be patient. After the first sync, the content will stay up-to-date in the index automatically).
After the sync is complete:
- All searches on the WordPress site will be served by WP Engine Smart Search without any additional configuration.
- WP Engine Smart Search will continue to sync data in real-time any time new content is added or existing content is edited
NOTE
If the WP Engine Search plugin is deactivated or uninstalled, real-time syncing won’t occur.
Delete Sync Data
If there are any issues with the content sync, delete the current search data and then sync again.
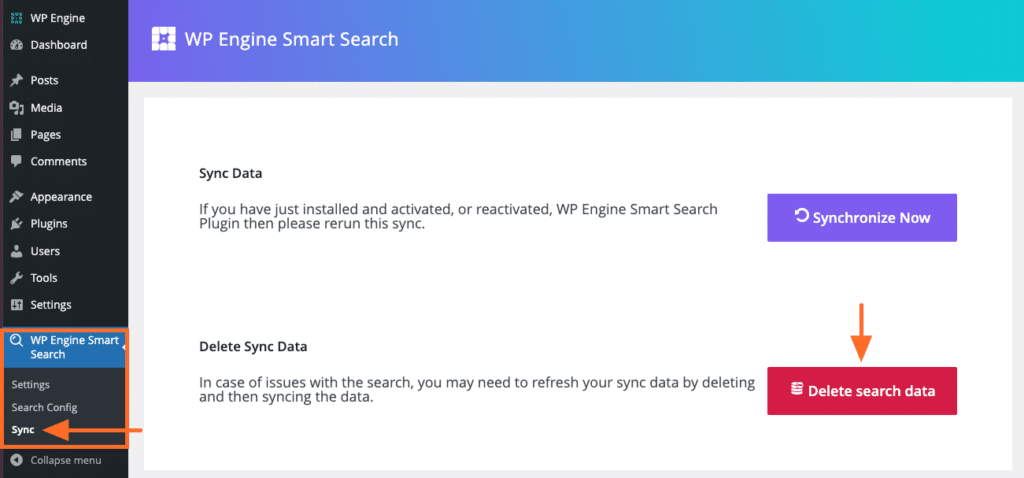
To delete sync data:
- Log in to the WP Admin dashboard
- Go to WP Engine Smart Search > Sync
- Click Delete search data
- When the deletion is complete, click Synchronize Now to run the sync again
If deleting the sync data doesn’t resolve the issue, you can remove the WP Engine Smart Search license from the environment and then enable it again.
NOTE
Removing the license from the environment and enabling it again should be a last resort fix. Please first delete all search data using the Delete Sync Data option, or using the public API, and then sync again.
Configure WP Engine Smart Search
After perfoming the first content sync, configure the WP Engine Smart Search settings. These settings give the most control over the search data.
To configure the settings:
- Log in to the WP Admin dashboard
- Click WP Engine Smart Search > Search Config
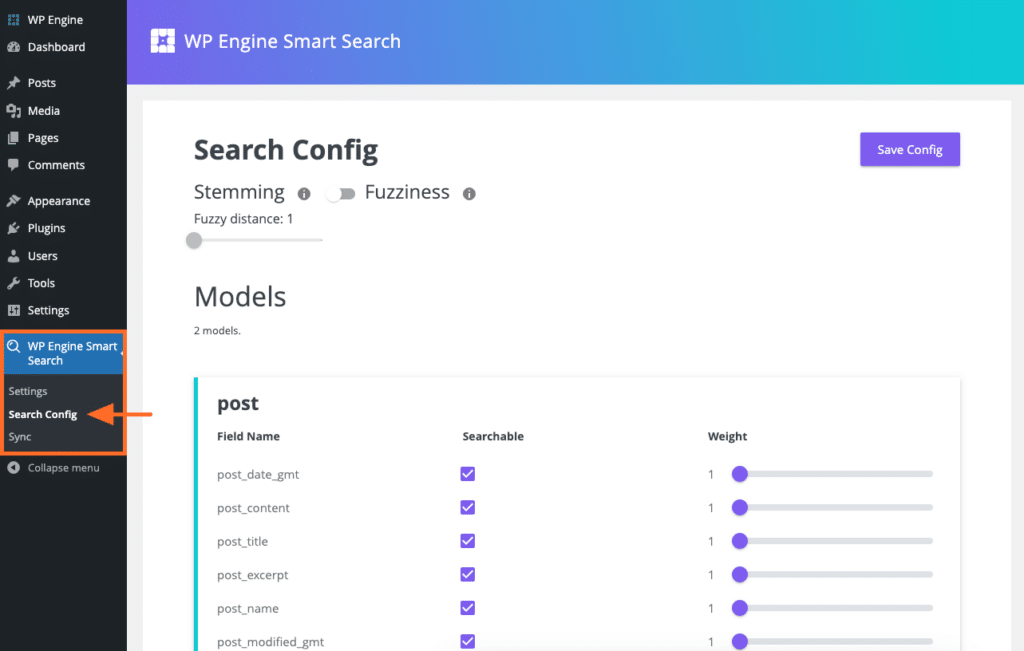
Search Method
WP Engine Smart Search provides two methods for searching, Stemming and Fuzzy, which can be uses to fine tune the way search works on the website.
- Stemming Search
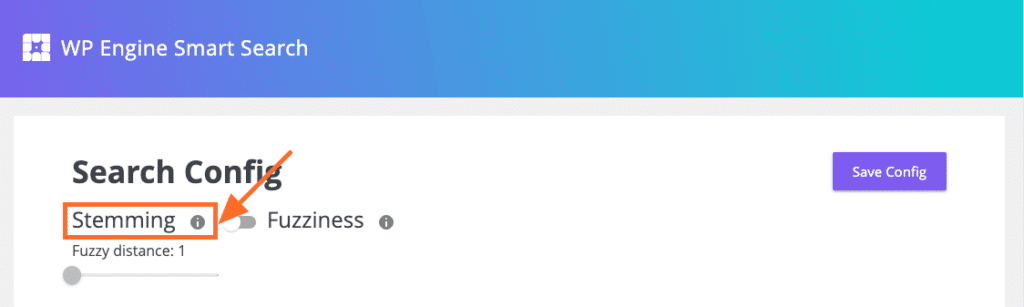
Stemming is the process of reducing a word to its root form or base word. This is the default search method of WP Engine Smart Search.
Stemming Search increases search relevancy because the plugin searches for both an exact match of what was typed into the search form, as well as a match of the stemmed (or root) word.
For example, if a user types in running, the results will include all content that contains the word running – the exact word they typed. But the results will ALSO include all content that contains the word run – the stemmed (or root) word.
- Fuzziness Search
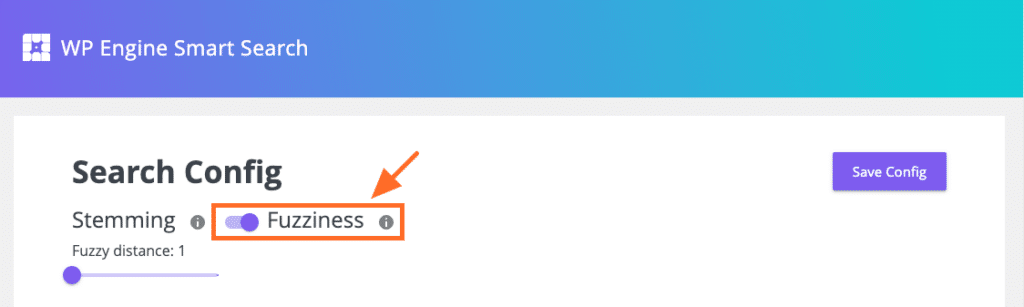
The Fuzzy Search method, which can be toggled on or off, can be used as an alternative to stemming search.
NOTE
If Fuzziness is toggled ON, the default Stemming search method will be disabled.
Fuzziness uses a letter-per-word tolerance (or “distance”) in the search terms to handle typos in the search. Use the slider to specify the fuzzy distance (1 or 2), which determines how many letters can be wrong in each word users type into the search form.

For example, if the Fuzzy distance is 1, a search for “Hallo Warld” would return results for both “Hello” and “World.” (Each misspelled word in this example contains only one wrong letter.)
If the Fuzzy distance is set to the maximum distance of 2, a search for “Haalo Waald” would return results for both “Hello” and “World.” (Each misspelled word in this example contains only two wrong letters.)
NOTE
A higher fuzzy distance allows for a better search experience with more relevant results.
Prioritize Content in Searches
The words users search for on the website may appear in various locations throughout the content. For example, a word might appear in a title, post content, custom fields, etc.
By default, WP Engine Smart Search searches all supported WordPress data type objects (such as Posts, Pages, CPTs, ACFs, etc.) by all of their supported fields (such as string, number, boolean, and other WordPress Data Type objects).
To limit what data can be searched or give more importance to certain fields to ensure highly relevant results, use the Searchable checkboxes and the Weight sliders.
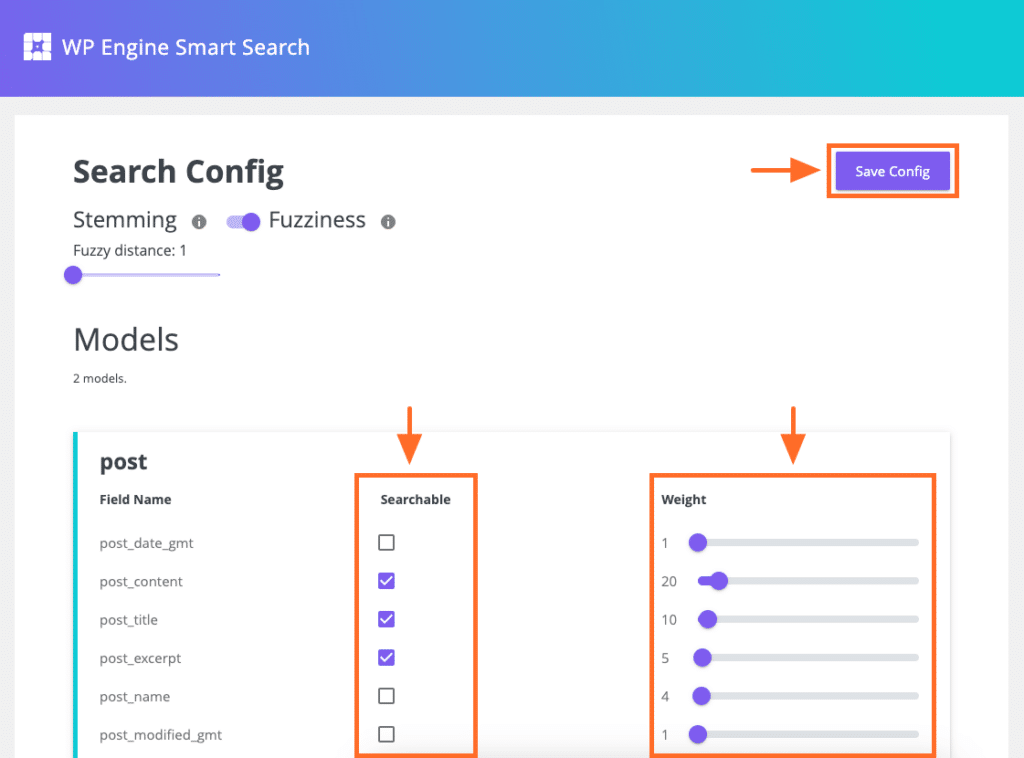
- Searchable Checkboxes
The searchable checkboxes allow for the inclusion/exclusion of a field from the search. Check the items to be searchable and uncheck the items to make them not searchable.
For example, for search results to only include posts that contain the search term in post titles, check thepost_titlebox and uncheck all the rest.
- Weight Sliders
The field-level weight sliders allow for some fields to be considered more relevant than others when determining the order of search results. Use the sliders to assign different weights to the searchable data fields. A field with a higher weight will be given a higher priority in the search results.
For example, setpost_contentto 20 andpost_titleto 10 so the posts containing the search term in the content will appear before the posts where only the titles contain the search term.
After adjusting the settings here, be sure to click the Save Config button.
Multisite Support
WP Engine Smart Search supports WordPress multisite. This allows your website visitors to perform searches on individual sites within the multisite network, and only see results for the site they are currently searching on.
Please note that after the plugin is network activated:
- The Sync and Settings pages are only available on the Network Admin screen.
- The Search Config must be configured for each individual site in the network.
Follow these steps to use WP Engine Smart Search on your multisite network:
- Enable WP Engine Smart Search on the environment that contains the multisite network.
- Log in to your WordPress admin and go to My Sites > Network Admin > Dashboard.
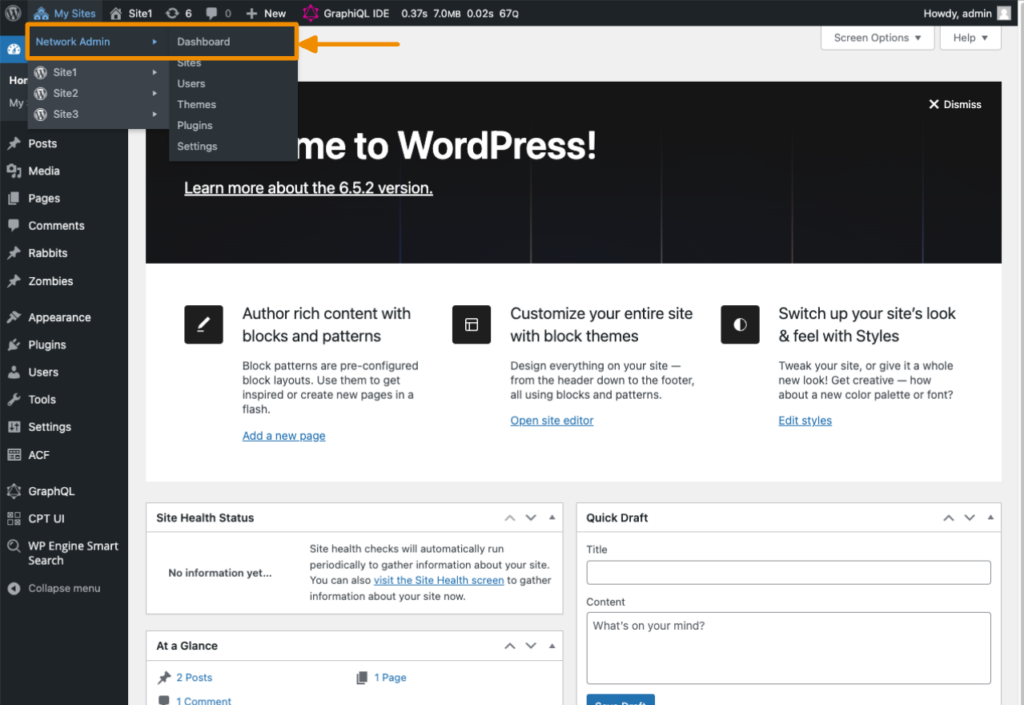
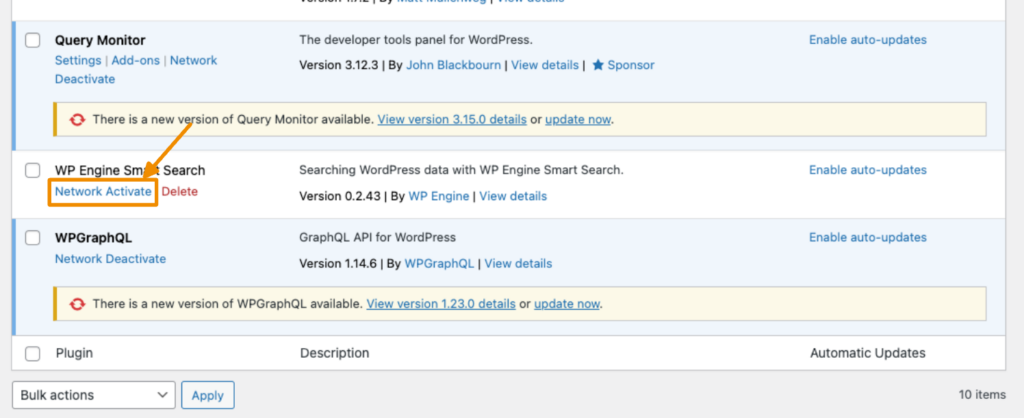
- Go to Plugins > Installed Plugins and click Network Activate for WP Engine Smart Search.
- Go to WP Engine Smart Search > Sync to sync the data for all sites currently in the multisite network.
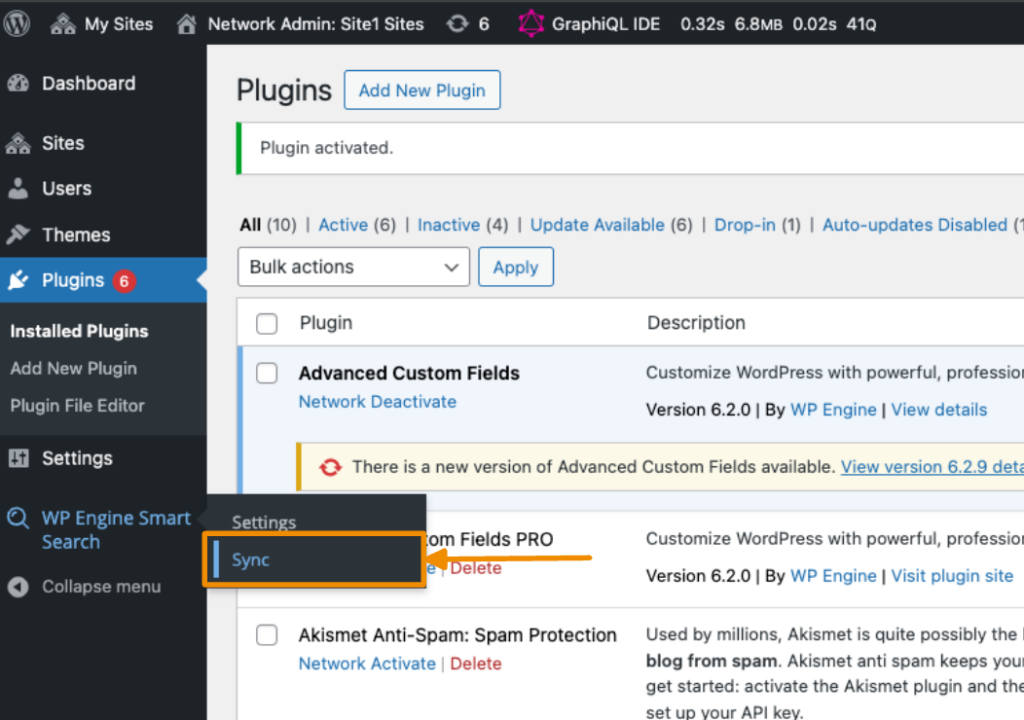
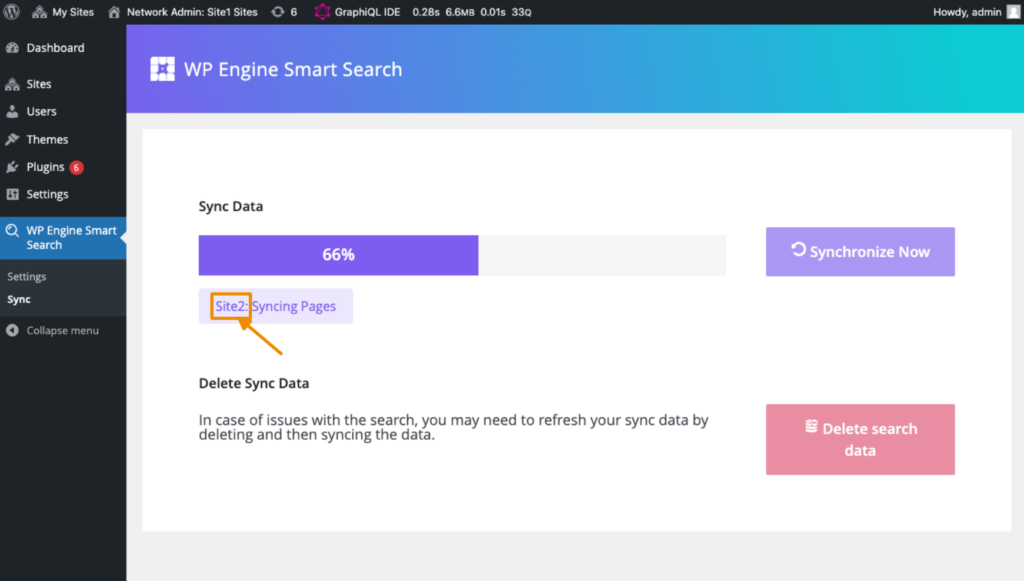
- Click the Synchronize Now button to begin the process.
While data syncing is in progress, you will notice that the status shows which site’s data is currently being indexed.
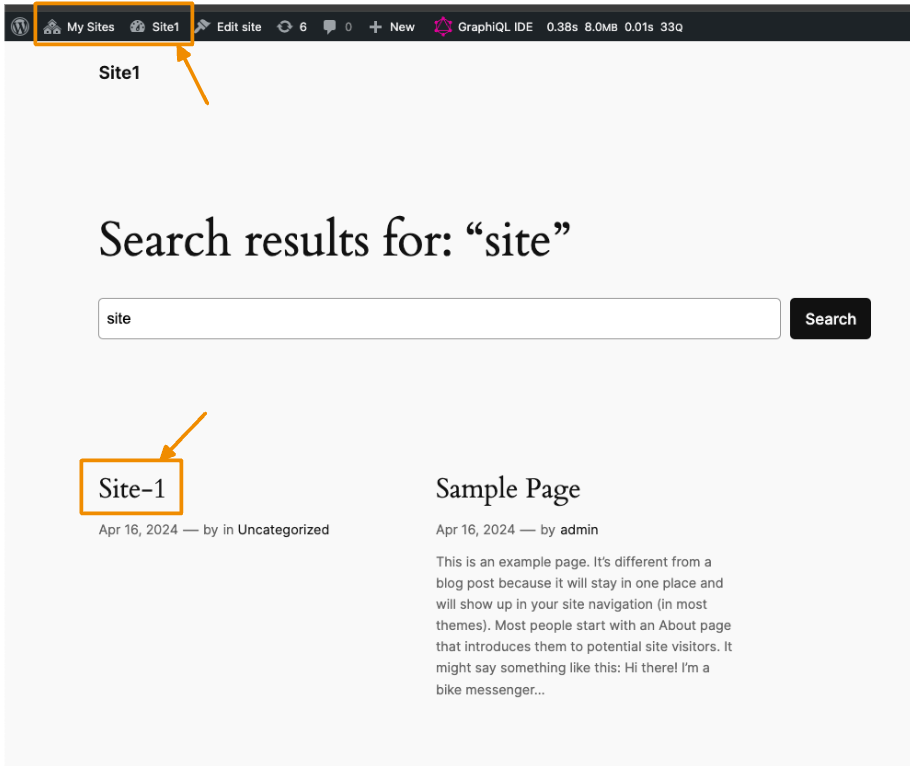
Once the sync process is complete, visitors can perform a search on each site in the multisite network individually. When they do, they will only see results for the site they are currently searching on.
For example, the image below shows that a search for “site” was performed on Site 1, and the results shown are only from Site 1.
WP Engine Smart Search Insights
Once you’ve installed and configured WP Engine Smart Search, you can see what your site visitors are searching for on your website.
To view these insights:
- Log into the User Portal and open the environment where you’ve installed WP Engine Smart Search.
- Click WPE Smart Search.
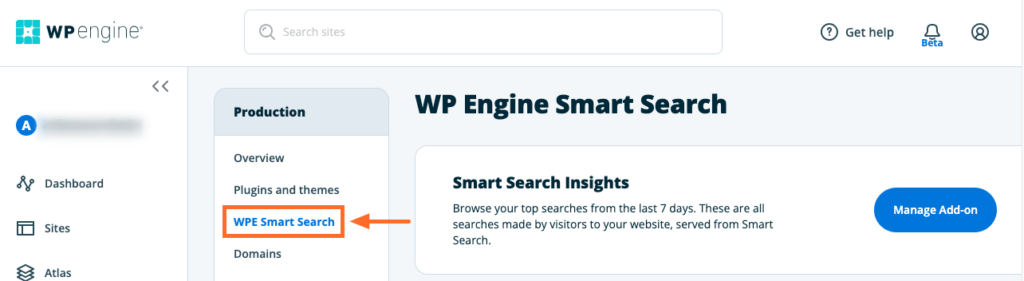
This is where you’ll find the top searches that were served from WP Engine Smart over the last seven days.
NOTE
When site visitors enter search terms on your site, they are immediately recorded here on the Smart Search Insights page.
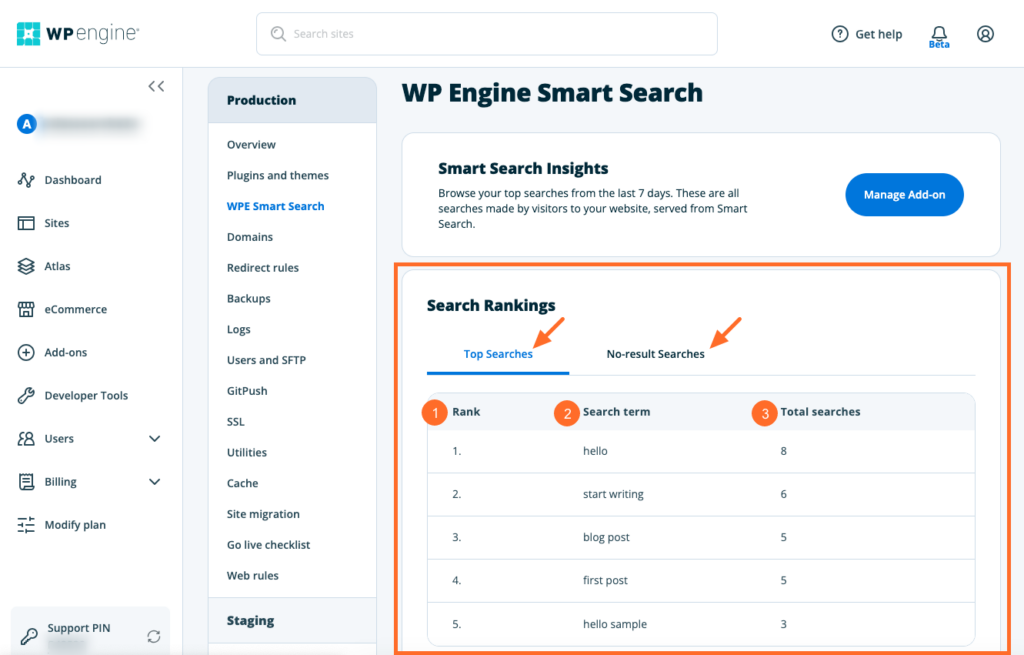
You can toggle between the Top Searches and the top No-result Searches to discover what users are looking for on your site.
- Rank: The order in which a term ranks on your site (from most to least searched).
- Search term: The terms visitors typed into the search box.
- Total Searches: How many total searches there were for the terms in the last seven days.
Atlas Platform Users
WP Engine Smart Search is headless-ready – without 3rd party vendors or complex integrations.
Setup on Atlas is just as easy as on a traditional WordPress site, and it comes with built-in headless search support, including WP GraphQL and ACF.
Installation for Atlas
As mentioned previously, WP Engine Smart Search can be installed automatically when applying a license to an environment (See Enable above).
To install the plugin through Atlas Blueprints.
The Atlas Blueprints pipeline will have:
- Installed & activated the WPGraphQL plugin.
- Installed & activated the WP Engine Smart Search plugin.
NOTE
When using the Atlas Blueprint method to install WP Engine Smart Search, apply a license to the environment where it’s installed to receive valid settings and to use the plugin.
Prerequisites for Atlas
The WPGraphQL plugin is required when using WP Engine Smart Search on the Atlas Platform.
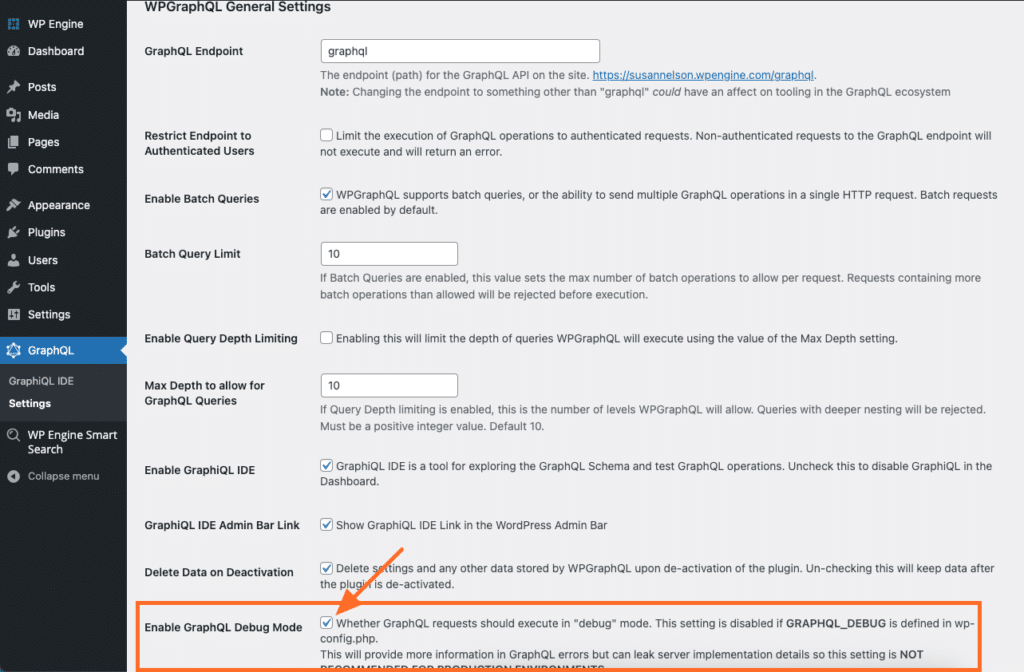
- Debug Information
WP Engine Smart Search adds debug information to WPGraphQL queries. To enable this, go to the WPGraphQL settings page and check the Enable GraphQL Debug Mode setting.
- Query Monitoring for non-WPGraphQL users
WP Engine Smart Search works seamlessly with the Query Monitor plugin for non-WPGraphQL users (see Debug Information above for how to access logs when using WPGraphQL).
The query monitoring plugin will allow users to view detailed information about the WP Engine Smart Search queries being made on their site, including the query string, the time it took to execute the query, and more. This information can be used to optimize search performance and ensure that searches are working as expected.
To use Query Monitor with WP Engine Smart Search, follow these steps:- Install the Query Monitor plugin on the WordPress site.
- Activate the plugin.
- Click the Query Monitor that has appeared in the WordPress Admin top menu.
- In the dashboard that appears, click on Logs.
- Run WP Engine Smart Search and see the data appear.
Querying with WP Engine Smart Search
After applying a license to a site and running the initial content sync, WP Engine Smart Search takes over the default WordPress search functionality and serves all the site’s search content.
The WPGraphQL plugin is a good place to test search queries. WPGraphQL provides a ‘GraphiQL IDE’ in the WordPress dashboard to interact with the WPGraphQL Schema in the browser. WP Engine Smart Search overrides the default search functionality for WPGraphQL queries on all WP Engine Smart Search supported WordPress data types.
Below is a screenshot of the WPGraphQL plugin & GraphiQL IDE view, where WP Engine Smart Search has overridden the default WP search behavior, followed by some sample queries:

Querying Standard WordPress Data Types
Here are examples of querying standard WordPress data types (Posts, Pages, and Custom Post Types (CPT)):
- Querying Posts/Pages:
{
  {either "posts" or "pages"}(where: {search: "CSS"}) {
    nodes {
      id
      status
      title
    }
  }
}
- Querying Custom Post Types:
{
  branches(where: { search: "Austin" }) {
    nodes {
      address
    }
  }
}
Querying for various post types and ACF fields
NOTE
WP Engine Smart Search has stopped support for ACM since version v.0.2.14.
WP Engine Smart Search also integrates with the Advanced Custom Fields (ACF) plugin.
Here is an example of querying for a custom data type:
- Querying ACF type of
project, with fields ofstreetAddress,contactName&workOrderNumber:
{
  projects(where: { search: "Austin" }) {
    nodes {
      streetAddress
      contactName
      workOrderNumber
    }
  }
}
Advanced Query Example
Fields can be queried that appear on the plugin’s Search Config page, including ACF fields, tags and categories, etc. Consider the following query:
seats.count:>4 tags.name:Cars hello AND world OR 123 4.56This search string uses a combination of search terms and filters.
It searches for records that match the following criteria:
- The
seats.countfield has a value greater than 4. - The
tags.namefield contains the value Cars. - The text “hello” appears in the record.
- The text “world” appears in the record.
- The record contains either the number 123 or the number 4.56.
The search string uses the following syntax:
- Search terms: Any word that does not contain a special character is considered a search term. In this example, “hello” and “world” are search terms.
- Filters: A filter is used to search for records that meet specific criteria. Filters are specified using the format <field name>: <value>. In this example,
seats.count:>4andtags.name: Carsare filters. Theseats.countfilter searches for records where the value of theseats.countfield is greater than 4, while thetags.namefilter searches for records where thetags.namefield contains the value Cars. - Logical operators: The search string uses the logical operators AND and OR to combine search terms and filters. The AND operator is used to require that both search terms or filters appear in a record, while the OR operator is used to search for records that contain either one or the other.
Order By
Currently, we support ordering by the following fields: DATE, MODIFIED. Also, these should be provided in the order direction: ASC, DESC. If orderby is not provided, the default weighting policy is applied – which is shaped by Search Config weights.
- Querying posts, order by
DATE DESC:
graphql
{
  posts(where: {search: "CSS", orderby: [ { field: DATE, order: DESC} ] }) {
    nodes {
      id
      status
      title
    }
  }
}- Querying ACF type of project, with fields of
streetAddress,contactName&workOrderNumber, ordered byMODIFIED ASC. In the event of the same modified date, further sort them in descending order ofDATE:
graphql
{
    projects(where: { search: "Austin" , orderby: [ { field: MODIFIED, order: ASC}, { field: DATE, order: DESC}] }) {
        nodes {
            streetAddress
            contactName
            workOrderNumber
        }
    }
}
Query Operators
WP Engine Smart Search treats spaces as an OR operator by default, whereas the default WordPress search treats spaces as an AND operator. With WP Engine Smart Search, explicitly specify the AND, OR and NOT keywords within the search query (these can combined too). This provides enhanced specificity for querying needs.
Here is an example of querying using different search operators:
- Using
NOTsearch operator:
{
  projects(where: { search: "Austin NOT Minnesota" }) {
    nodes {
      streetAddress
      contactName
      workOrderNumber
    }
  }
}
- Using
ANDsearch operator:
{
  projects(where: { search: "New York AND Texas" }) {
    nodes {
      streetAddress
      contactName
      workOrderNumber
    }
  }
}
- Using
ORsearch operator:
{
  projects(where: { search: "New York OR Texas" }) {
    nodes {
      streetAddress
      contactName
      workOrderNumber
    }
  }
}
Public APIs
The Public APIs grant the ability to interact with WP Engine Smart Search programmatically.
- The GraphQL Search API (also known as Find API) allows searching for documents in an index based on specific parameters.
- The GraphQL Index and Delete API includes mutations for creating, updating, or deleting documents.
Access the API documentation here:
NOTE
These APIs and their endpoints are in BETA. Beta Services are described in Section 2.e. of our terms of service.